Setup Eclipse for Android Programming

This is a fairly simple process but there are always a few things I forget.  Once you have your Eclipse setup with Android development, you can Import some of there example projects and run them right way (point to you Android SDK folder and Import project process will find the available projects).

1.  Install a fresh copy of Eclipse just for Android programming.  I like to keep my Android development separate from other development using Eclipse, like Java, etc.  Follow my blog here on configuring Eclipse, I use the path c:\Tools\android-eclipse-XXX.

2.  Install the Android SDK.  I like to install in in my c:\SDKS folder.

3.  With Eclipse open, go to menu Windows^Preferences.  The preferences dialog will open.  Click the Android node.  You should see an input for SDK Location.  Pick the folder where the SDK was installed.  For me it was c:\SDKS\android-sdk.  Click the Apply button, then OK for the Preferences dialog.

image

Android Layout Stops Working in Eclipse

So far most of the Android development in Eclipse has been smooth sailing.  There is one issue I’ve come across over and over, I get the error message "No XML content. Please add a root view or layout to your document."  A few times I was able to fiddle with the layout and it would just start working.  This last ADK update, I had enough so I went searching again.  This time I found an answer to my prayers.  It turns out that if you have any custom device configuration in the layout editor that do not contain the proper qualifiers, you will get this issue, see thread here.

Solution

Add all applicable qualifiers.

1.  Open screen editor list.

image

2.  Open your custom screen, then move the necessary qualifiers over.

image

Inkscape, A Cool Vector Graphics Tool!

I won’t be the first to admit that I stink when it comes to my graphic design skills, but I do know how to solve problems when presented with one.  I had a major problem that was racking my nerves, icons for a web site and phone app I was developing.  Knowing the result I wanted, I soon employed the help of Google.  Low and behold I can across Inkscape, an awesome scalable vector graphics program and it was free!  Armed with this new tool I still had one issue, how the heck am I going to use this thing (that would be my lack of design knowledge bubbling up).  No worries, I wasn’t out yet.  After searching a little bit for some of the results I was looking for, I came across this blog, screencasters.heathenx.org (my hats off to you).  In no time, i was able to accomplish buttons, special affects, paper folds, etc.

Install on Windows

1.  Install GIMP.

2.  Download Inkscape and install for windows.

Connecting to TFS Preview : Visual Studio and Eclipse

Overview

Lately I’ve been working personal project here at home that requires both Visual Studio and Eclipse.  I was pleased when TFS 2010 came out and Teamprise (now Team Explorer Everywhere) had a seamless integration with TFS 2010, the experience is identical to that in Visual Studio.  One thing I grow old of is managing data from the personal projects or even small company projects that don’t need the hassle of installing, maintaining,and backing up an installation of TFS, especially at home.  When Microsoft introduced there TFS 2010 SaaS in the cloud, I was very anxious to try it out.  I was fortunate enough to get a taste thanks to Brian Harry.

Solution

In order to connect to your X.tfspreview.com account with Visual Studio or Eclipse you will have to do the following.

Visual Studio

1.  Ensure you have Visual Studio SP1 installed.

2.  Ensure you have hotfix KB2581206 installed.

3.  Now when you add a server like you normally would in the Team Explorer window you will get the following when going to connect.

image


Eclipse

1.  Ensure you have Team Explorer Everywhere 11 Developer Preview installed.  There is one caveat unfortunately.  There is a bug with this where it will not work for Windows XP running on 32-bit system (Arg!  I was a bit bummed at this as this is the dinosaur that I have; here is the issue I get).

2.  Now when you add a server like you normally would in the Team Explorer window.


Build Server

If you want to have a build server that talks to tfspreview you will need to install the latest for the preview as well, Web Installer or ISO.

Printing HTML Landscape Using Print CSS File

I think one of the hidden gems of web applications is that you can mold your page for printing using a specific CSS file or printing.  I wrote post a while back Printable Web Page which covered using the CSS media attribute for your <link> reference.  The other day I was working on some reports that had some table cut off issues.  I discovered there are a couple approaches that you can take, including using fixed width (though you’d need to know your printer widths) or using landscape and percents for tables.  I chose to do the later. 

If you add the following to your CSS file used from printing, it will default the users printing to Landscape and remove the margins.  I set by tables to use a width of 100% or less to fit on the screen.

@page {
size:landscape;
margin:0;
}

Web Deploy 2.0 Setup Using TFS 2010 Builds

I have a previous blog post about setting up WebDeploy 1.0, which works well but 2.0 has more management features.  Despite the added management features, setting up version 2.0 seemed to be a bit more daunting.  One thing i noticed is that there isn’t much documentation out there but there are a lot of people blogging and posting on it.  In this thread I will summarize what I found was needed to get it working correctly for TFS 2010 or Visual Studio 2010.

Configuring Your IIS 7 Server

We’re using 2008 Server so the screen shots below will be from IIS 7. 

1.  Make sure the IIS Management Service is installed.  Go to Server Manager and add the Role Service as show below.

image

2.  Install the WebDeploy 2.0.You can download the platform version from here x86 or x64, 2008 uses x64.  NOTE:  Something that I ran into which seems to be a bug in the installer is that it missing installing a needed component.  To fix this you first install it then run the installer again but the second time you select Change which will then show you the extra item that wasn’t present the first time.  The installer should look like the image below, the highlighted section is what showed up the second time I ran the installer.  You must have all these components.

image 

3.  Go into IIS manager (Start^Run then type inetmgr).  Here you will need to configure a few items.  Select you server from the the connection dialog on the left.  You will be working in the Management section of the screen.

image 

4.  In the Management section, double click Management Service Delegation.  Once the delegation screen has come up you will want to add some new Rules.  In the upper right click Add Rule.  The rule that I needed was “Deploy Applications with Content” but you can add other predefined rules if needed.  I’ve found that the delegation providers I needed were “contentPath, iisApp, setAcl, createApp”.

image

The only thing I set on the rule was which type of user was going to connect to do the deployment.  In my case it was a specific AD account but it can be and IIS account.

image

5.   Go back to the Management home screen show in step 3.  This time double click Management Service.  In order to make changes you must stop the service first, which can be done on the right navigator.  The items that you want to take not for configuration are highlighted below.  Ensure that he check box “Enable remote connections” is checked.  The default port the service listens on is 8172, which I left.  By default the the install of the Management Service creates a self signed certificate.  I chose to create my own and use that.  Make sure the service is started before leaving this dialog (you can also find service is services applet with name “Web Management Service”).

image

NOTE:  If you enterprise uses a firewall, the call to the management service may not work.  You can check by going into a browser and navigating to https://youserver:8172/msdeploy.adx, if you are prompted for credentials it’s working otherwise the firewall is blocking it.

6.  This completes the IIS setup.


TFS Build Setup

Now that IIS is configured for remote deploy, we can create a build definition to deploy our web application to.  This is much like the previous blog post on setting up the parameters.  I’m going to skip all some of the attributes of the build definition as they don’t apply to making the WebDeploy work.

1.  Within your project in Team Explorer, right click Builds and select New Build definition.  Setup the basic build information:

  • General: build definition
  • Triggers: whatever triggers you want for this build
  • Workspace: select the workspace for the build
  • Build Defaults: select a build controller and drop location
  • Retention Policy: set any retentions you want

2.  The part that gets the web deploy working is in the Process section.  Expand all the numbered sections so you can see the attributes that need to be set.  First set the “Items to Build” which will specify the build flavor (i.e. Debug, Release, etc.) and the Solution/Project that represents you web application that you are deploying.

image

3.  The most critical piece is the MSBuild Arguments shown in the image above.  Unfortunately the arguments for Web Deploy are not well documented, but the ones below worked for my configuration.  You may have to grant you user permissions on the IIS machine to folders which pertain to you deployment, see this other good thread on configuration web deploy, Configuring MSDeploy in IIS 7.

/p:DeployOnBuild=True

/p:DeployTarget=MsDeployPublish

/p:CreatePackageOnPublish=True

/p:DeployIisAppPath="My Web Site Name"

/p:MsDeployServiceUrl=MyServerName:8172/msdeploy.axd

/p:username=MyUserName

/p:password=MyPassword

/p:AllowUntrustedCertificate=True

4.  Save the build and queue it.

TFS 2010 Web Deploy Unauthorized Operation During Build

I’ve been working on using web deploy to automate our builds of some particular web sites we have built internally.  I’m using Web Deploy 2.0, IIS 7.5, and TFS 2010.  It’s been working fine until today when we get this message:

C:\Program Files (x86)\MSBuild\Microsoft\VisualStudio\v10.0\Web\Microsoft.Web.Publishing.targets (3847): Web deployment task failed.  An error occurred when the request was processed on the remote computer. Failed to invoke or execute createApp provider on the web server.  The Web Deployment Tool’s createApp provider is either not enabled or failed to executed specific commands on the server.  Please contact your server administrator for assistance. (Web Deploy Provider is "createApp"). Error details: An error occurred when the request was processed on the remote computer. Attempted to perform an unauthorized operation. createApp http://go.microsoft.com/fwlink/?LinkId=178034

I search around and found that “createApp” is one of the Providers in the IIS Manage Service Delegations (see image below).  Initially when I was setting up web deploy I was following someone blog post on this and their recommendation was using “contentPath, iisApp, setAcl” which worked until today.  When I added “createApp” it fixed the issue.  See my blog on setting up web deploy.

image

Report Manager URL Not Using SSL SSRS 2008 R2

If you’re using SQL Server Reporting Services 2008R2 and have configured it to use SSL but are having issues in Report Manager where the context menus and other links are non-SSL, read on.  Apparently when you follow the simple steps to enable SSL with a certificate that you’ve installed on your Report Manager machine, they don’t point out that you need to remove the the port 80 URL otherwise Report Manager links won’t always be https!  Follow the steps below to fix this issue.

1.  Open the Report Service Configuration Manager.

2.  Go to the Web Service URL tab on the left.  Click the Advanced… button.  Remove the HTTP identity of the report server.  Click OK.

image

After it is removed for the Web Server you should see the following.

image

3.  Now navigate to the Report Manager URL.  Click the Advanced… button.  Remove the HTTP identity of the report server.  Click OK.

image

After it is removed for the Web Server you should see the following.

image

Using SSL and TFS 2010 for Reporting Services All-In-One Install

A current deployment I’m working on for TFS requires that everything use SSL, which includes the TFS part and SQL Reporting Services (SSRS) reports (report manager/report web services).  We are diving into customization on some of the reports and someone mentioned that our Reports folder in Visual Studio has a red X on it (see below).

image

Everything else with regard to TFS was working fine over SSL, we could even access the report manager for SSRS, so I knew it had to be some in TFS that drove Visual Studio and the link in the Team Web Access.  Follow the steps below to fix this predicament.

1.  Log on to your TFS server and open the TFS administration console.
2.  Select the Reporting node in the left navigator

image

3.  Click the Edit link on the right side of the screen.  It will ask if you want to stop the schedule jobs, click OK.  A dialog with 3 tabs will come up.  Select the Reports tab.  In this tab, set the Web Service and the Report Manager to the SSL base URLs that represent your SSRS installation, for example https://tfs.mytfsmachine.com.  Note that once you change the Web Service url you will have to re-enter the data source user’s password.  Once you have update the fields, click OK.  See the image below.

image

4.  Start the jobs again by clicking “Start Jobs” on the right.  You are done.

To check that it all works go into Visual Studio and connect to your TFS server.  The red X should be gone from a team project’s Reports folder.  Also check you Team Web Access (https://{your dns name}/tfs/web/) to make sure that the link to the reports from the web page correctly uses the SSL url.

IIS 7 and Later Application Pool Folder Permissions

The other day I was creating a static web site in Windows 2008R2, and after creating the site I kept getting an access denied.  I scratched my head for a bit as in the past with IIS 6 it usually just worked the first time.  In IIS 7+, the new site will default to creating a new application pool.  Also in the past there were issue with application pools being run under Network Service since this was a built in account.  Now these new application pools run under ApplicationPoolIdentity, but the caveat is that you have to apply folder permissions so that the new application pool can read your web content; this wouldn’t apply if you are running the pool under a dedicated local or AD account.  After searching for a while I found that in order to assign folder permission like you would any other user, you have to use this user name convention "IIS APPPOOL\{YourAppPoolName}” where {YourAppPoolName} is the name of your application pool.  With this information you can go to you folder’s properties and set the permissions accordingly.

Visual Studio XML File Transformation Not Just For Web.Config

Being able to manage environment settings can be such a pain sometimes, especially when your doing it manually.  As of Visual Studio 2010 you are now able to associate environment specific settings based on a build configuration.  Imagine that you have a developement, QA, and production environment each having different database connections strings, log file paths, etc.  It would be nice to set this once and let the build determine the right output for you app.config file, no?  Well this feature is built in to web projects by default, but can be extended to any type of xml file.  There are a few steps to get it working but I will describe them below.  Most of these steps are based on this article XDT (web.config) Transforms in non-web projects which explains the general process and has an example attached.  There are a few items I will discuss which are not included in this article.

Prerequisites

  1. Visual Studio 2010 which has web projects (this conatins the TransfromXml build tasks).
  2. Create a folder %ProgramFiles (x86)%\MSBuild\Custom.  Download TransormFiles.targets and save to this directory with name TransformFiles.targets

Solution

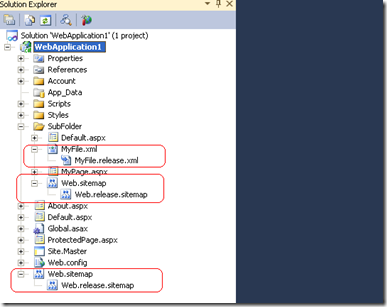
In the solution below I will be use a WebForms project with additional xml files along with the default web.config file, a web.sitemap and a myfile.xml.  My project looks like the image below.

image

1.  Add the <Import> for TranformFiles.targets to you project file. 

Right click on you project and select “Unload project”, project should unload and be grayed out.  Right click again and select “Edit xxx.csproj” where xxx is your project name.  The project file will open and at the end of it put

<Import Project="$(MSBuildExtensionsPath)\Custom\TransformFiles.targets" />

image

2.  Update project file so that non app.config XML files’ (web.config in web project) are nested under the transformed file.  We’ll use the <DebendentUpon> element for each build file. For example a web.sitemap will have a web.release.sitemap if you are transforming you sitemap.

image

3.  Add the <TransormOnBuild> node to any XML file that is not a web.config file, this includes app.config files if you are not using a web project!  You only need to add this node to the files that have transformations applied.  For example, the web.sitemap will get this but the web.release.sitemap won’t.

image

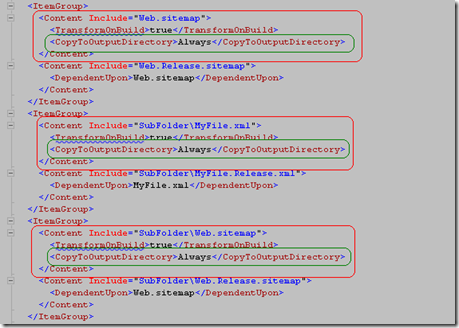
4.  If you are using a web site project add the <CopyToOutputDirectory> to all XML files that will be transformed, other than the web.config file.  This will copy the transformed files to the bin folder of you build since it won’t copy the transformation to the same place as web.config file, unfortunately.  After the build you’ll have to manually copy these to their respective destinations.  Fortunately the output in the bin folder will have all the correct paths for these XML files.

image

imageProject view after steps 2-4

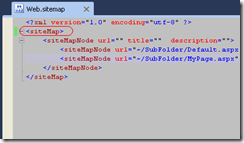
5.  Add the XML transform namespace http://schemas.microsoft.com/XML-Document-Transform to all you transform files.  If it’s a web project, remove the xmlns namespace in the root node of the web.sitemaps; if you don’t the transformation will not work on these files.  See Web.config Transformation Syntax for Web Application Project for the different transformation capabilities.

image

image 

6.  Build you code.  You should now see the transformation you applied.

ASP.NET CollapsiblePanelExtender Printing Content

The other day I was working with the ASP.NET Ajax toolkit’s CollapsiblePanelExtender and have the toughest time getting the content within the panel to print.  I found that there were 2 issues going on: 1)  you have to expand you panel before you print, and 2)  there is some CSS magic that you need to do to get all the content to show.  For the first issue, you have to expand all the panels before you print, which you can do using some JavaScript, unfortunately you can’t fire this when the user select File^Print.  The second issue I resolved using the CSS print media type, which I have an example of the principle here Printable Web Page

Expanding Collapsible Panels

This can be achieved by a little JavaScript.  In my situation the user’s wanted a toggle in the UI, I used a check box but a button can do the same thing.

1.  Create the UI toggle item that will fire JavaScript onclick event.

<input type=”checkbox” onclick=”toggleCollapsibleSections();” />

2.  Create the JavaScript that will expand/collapse the panels.  Note I’m using jQuery here to find the elements and that the ID of the collapsible panel is the client ID for the CollapsiblePanelExtender.  If you’re using .NET 4.0 you can set the extender’s ClientIDMode to Static otherwise you will have to either use CSS class to find extenders you want or spit our the X.ClientID where X is the extender control.

function toggleCollapsibleSections() {
    var isChecked = $("#toggleCheckbox").attr("checked");
    if (isChecked) 
        expandSections(true);
    else 
        expandSections(false);
}

function expandSections(doExpand) {
    if (doExpand) {
        $find("MyCollapsiblePanelExtenderClientID")._doOpen();
        // + all other section i want to open
    }
    else {
        $find("MyCollapsiblePanelExtenderClientID")._doClose();
        // + all other section i want to close
    }
}

Printing Collapsible Panel Content

This was a tough fix.  In a nut shell the CollapsiblePanelExtender applies a inline style “overflow” to the div that wraps you content.  This causes the printing to cut off the content within you section if the content is high enough.  The way to solve this is to define a overflow style for all div’s in you print media CSS file.  See Printable Web Page on details about defining and using print media CSS.  The CSS is listed below.  Notice the usage of the “!important” this will override any inline styles that the ajax toolkit has applied.

div { overflow: visible !important; }

IIS Manager Enable PUT DELETE Methods, REST

Recently I’ve been working with some of the newer IIS7/7.5 and using the IIS Manager, which happens to be quit nice.  They’ve done a great job at simplifying management from a IT perspective as well as a development perspective.  I ran into some trouble while trying to use the PUT and DELETE verbs in a ASP.NET MVC site.  I’m a bit of a purist, to some extent, and like to use the verbs for what they mean.  I kept getting a request not accepted using the PUT and DELETE verbs.  It turns out that you need to remove the WebDAV from the HttpHandlers and HttpModules which can easily be found in the IIS manager. Below shows a screen shot of the management view and the 2 location where you need to remove the WebDAV to enable PUT and DELETE methods.

image

Deploy ASP.NET MVC Dependencies to Hosting Provider

Lately I’ve been working with Visual Studio 2010 and have been quite impressed by some of it’s features.   One feature in particular is the web site publishing capabilities.  The other day I was trying to frantically get a school project done and needed to deploy to my hosting provider, WinHost.  I have to briefly say that I’ve worked with a few top name providers that host ASP.NET and this one has been the best with great how-to’s on up-to-date technologies like Visual Studio Web Deploy and has a awesome management console.  Anyway, that’s not what I came to write about.  So after I deploy my code with a snap using Web Deploy, I get a few errors when trying to run my site.  Here I was all stoked that the Web Deploy was so effortless, to come to message like “Could not load file or assembly System.Web.WebPages.Razor” and “Could not load file or assembly System.Web.Helpers”.  Man what a buzz kill.  So not all hosting providers have ASP.NET MVC 3 yet (i.e. loaded in the GAC on there servers) which obviously we can’t do.  There are a couple of ways to fix this.  One is to grab the dlls listed below and store them in some library folder from which you can reference in your project.  The alternative, and better approach, is to indicate that your references you already have should be set to “Copy local”.  I’ve provided a screen shot and a list off the dlls which are needed by a ASP.NET MVC 3 application.  If you’re doing a MVC 2 or you will not need all these dlls.

image

DLLs needed:

  • Microsoft.Web.Infrastructure
  • System.Web.Abstractions
  • System.Web.Helpers
  • System.Web.Mvc
  • System.Web.Razor
  • System.Web.Routing
  • System.Web.WebPages
  • System.Web.WebPages.Razor

You may be wondering why your project doesn’t have all these references.  No sweat.  You can just add them.  I like to install Visual Studio Productivity Power Tools, it makes the add reference experience nicer.  Once you have the DLLs referenced in you project, right click the ones listed above and select Properties.  Set the “Copy local” attribute to true, see image below.  That’s it, redeploy your site and you’re set!

image