Reporting Services Alternating Row Colors

Reporting Services is a easy way to produce good reports with little effort.  A common tablature based report style is to have rows of alternating color.  This eases the readers eyes when it comes to visually scanning and extracting data row by row.  In order to alternate the row color, you need to give the BackgroudColor property of the row a formula to determine which color to apply.  Here is a basic formula to switch colors between white and gray.

=iif(RowNumber(Nothing) Mod 2, "White", "Gainsboro")

The UI property window would look like the image shown below, where the red arrow points to the tables highlighted row.

rs_row_alt_color

Using Subversion With Visual Studio

There are a few source control options out there, other than TFS, that provide good source control if you are working in Visual Studio.  If you have an operation that doesn’t need or want to spend the money of TFS, Subversion (SVN) is a good alternative.  You can even sign up for free SVN at Unfuddle; they also have priced packages as well.  Using SVN with Visual Studio is actually quite easy using the plugin by AnkhSVN.  One of the nice features is that you can use this SVN plugin in conjunction with TFS.  The following shows how to set this up.

1.  Download and install AnkhSVN for your version of Visual Studio.

2.  Once AnkhSVN is installed, you must tell Visual Studio to use this as the source control system.  Navigate to Tools^Options.  You will see a screen like the one below.  Select the AnkhSVN source control option.
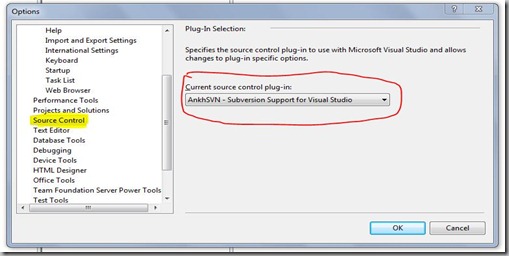
selecting_source_control_options 

3.  Now we can add our solution or project to SVN source control.  If you right click a solution or project in the Solution Explorer you will see SVN options like the image below.

add_sln_to_svn

In this case I was adding a solution, so select “Add Solution to Subversion”.  A window will appear like the image below.  This is where you select the SVN source control location.  Verify that all the other settings are as you want, such as Project Name or Local Folder (the location of the code you are adding).  Once everything is set, click OK and all the files will be uploaded to SVN.  Once the files are uploaded you will see a “+” sign next to everything.  Right click on the solution one more time and select “Commit Solution Changes”.  This should change the yellow “+” to a green check mark.  Your done.

add_sln_window

4.  Once everything is is checked in, you can go about modifying code again.  Anytime you modify a file, you will see a red check mark next to the file; this is similar to TFS’s little edit person icon when a file is in shared edit mode.  To check the file back in, just right click the file, project, or solution and select “Commit…”, “Commit Project Changes”, or “Commit Solution Changes”, respectively.  It’s that easy.

Using master dbschema File To Resolve Login References

If you’re using MS SQL Server, Visual Studio’s database projects are a good way to manage your database objects.  After importing your database schema, if you working with existing databases, or creating from scratch, you will typically need a reference to the master.dbschema.  A typical error due to an unresolved server login reference will say “Error TSD03006: User: [someuser] has an unresolved reference to Login [someuser].”.

The schema file is just a xml file of the server object meta data, this is how it can resolve references when referenced by other database projects in your solution.  The VS Database Project comes with master.dbschema files that you can copy and modified if needed.  The different version of SQL server schema files can be found in “C:\Program Files\Microsoft Visual Studio 9.0\VSTSDB\Extensions\SqlServer\”, if “C:\Program Files\” is your installed path of VS.  I would copy the master.dbschema file that you need to another location and rename with an appropriate name so others know what it represents.  If you have server logins that you don’t want to manage through you build and deploy, adding them to this copied master schema file is the way to resolve the build references.  Below shows the an example of the element that would need to be added to the dbschema file to resolve a particular login, the added part is italicized and bold.

<DataSchemaModel FileFormatVersion="1.0" SchemaVersion="1.0" DspName="Microsoft.Data.Schema.Sql.SqlDsp.Sql100DatabaseSchemaProvider" CollationLcid="1033" CollationCaseSensitive="False">
<Header>
<CustomData Category="ModelCapability">
<Metadata Name="ModelCapability" Value="Default" />
</CustomData>
<CustomData Category="DBSchema">
<Metadata Name="DatabaseType" Value="master" />
<Metadata Name="SqlServerVersion" Value="10.00" />
<Metadata Name="Author" Value="Microsoft Corp." />
</CustomData>
<CustomData Category="DatabaseVariableLiteralValue">
<Metadata Name="Name" Value="master" />
</CustomData>
</Header>
<Model>
<Element Type="ISql90Login" Name="[someuser]">
<Property Name="DefaultLanguage" Value="us_english" />
<Property Name="IsCheckPolicyOn" Value="False" />
<Annotation Type="GloballyScoped" />
</Element>

</Model>
</DataSchemaModel>
 
Once this is added, the login in reference error will resolve correctly.  Notice that I only have the one <Element> under the <Model> node.  If your projects don’t require usage of most of the master server objects, like extended procedures, you can removed them from the <Model> node.  Doing this trimming is worth the effort, especially in the cases where your using another projects dbschema file of which only a few items are needed to resolve references.  A good article of dbchema file trimming can be found here Right sizing the master.dbschema file for better design time performance.  Only including the necessary element in the model will reduce build time for projects depending on the schema file.

View Errors Migrating WebForms To ASP.NET MVC Pattern

I’ve been working a project where we had a really solid WebForms application, but wanted to utilized ASP.NET MVC and more client side programming.  We created some partial views used by some controllers and kept getting this error “The name 'Model' does not exist in the current context”.  It turns out that the the Views folder needs a web.config file underneath it.  The easiest way to do this is to copy a web.config from the Views folder in a template project of a MVC web app.