Showing posts with label Team Foundation Server. Show all posts

Getting Revision Number in TFS Team Build

If you’ve ever been wondering how to get the value of the $(Rev:r) (or $(Rev:rr)) value in you team build, you can’t.  If you have a pretty boilerplate versioning where you do Major.Minor.Release.Revision then using the $(Rev:r) is pretty handy.  A company I work for now uses Major.Minor.Patch.Revision.  Below is how I was able to extract the revision number during TFS build workflow time.

1.  Our BuildNumberFormat is set close to the default: $(BuildDefinitionName)$(Rev:.r).  We can use this fact to extract the revision number.

2.  Create a string variable that is scoped to Run On Agent called RevisionNumber.  Don’t use Version or something like that which has a class name in the TFS namespaces (i.e. Version is type being used as int).

image

3.  Near the top of the “Run On Agent” area of you build template, add a Assign task item from the toolbox.  I added mine to the sequence called Initialize Variables because it logically made sense here.

  • Set To to be RevisionNumber
  • Set Value to be the following expression
Int32.Parse(BuildDetail.BuildNumber.Remove(0, BuildDetail.BuildNumber.IndexOf(".") + 1))


With this in place you can use the revision number to create any numbering based of this value.

Errors In TFS Build Definition With Different Version of Visual Studio Installed

As Visual Studio 2012 and 2013 came out, I installed them to try them out and get to know the enhancements and changes.  At work, we use Visual 2010 and TFS 2010.  Using the team build workflow is OK, it has it merits with visual layout and .NET code access when using activities like if statements.  The one downside that I ran across after install VS2013 was nearly the whole workflow build definition had errors now!

It turns out that there are assembly reference issues between having VS2010 and VS2013 side by side.  Being a little dismayed, and not to mention ugly to look at, I ventured into what to do to fix it.

1.  First, you have to manage your build definition in a project just like you would code.  Below is an example.  The project can be a simple class library with not code files, just build definitions.  I do this whenever I setup TFS.

image

2.  You need to add a reference to all the libraries being reference in the xaml code.  If you open your xaml by selecting View Code you can see all the references.  To add reference right click project references and navigate to the location of the correct TFS libraries, most of them are in C:\Program Files (x86)\Microsoft Visual Studio 10.0\Common7\IDE\ReferenceAssemblies\v2.0\, I just search for dll under C:\Program Files (x86)\Microsoft Visual Studio 10.0.

image

image

Fixing 'mscorlib.dll' targets a different processor When Building x86

Currently I’m working on a product that has been around for a long time, and will be for a lot longer.  Even thought 64bit has been out for a long time, this application has it roots in 32bit.  This is not necessarily a bad thing, as 64bit will not provide any real processing performance enhancements.  Prior to Visual Studio 2010, building with AnyCPU platform configuration was straight forward.  Now that we support purely 64bit OS on our server side, things because a little more difficult.  Long story short, we needed to configure everything to specify x86.  In doing so, we continued to get build errors on our TFS team build server.  The error “error CS1607: Assembly generation -- Referenced assembly 'mscorlib.dll' targets a different processor” would show up all over the place.  After ensuring that all our projects were set to x86 and the Configuration Manager for debug/release specified x86, we eventually found that the build process MSBuild Platform needed to be set to X86.

As an interesting note, in our researching over x86 and x64, we came across this article AnyCPU Exes are usually more trouble than they're worth.  If you’ve been adding new projects in Visual Studio 2010, you’ll notice that they all default to x86. 

Team Foundation Server Custom Controls

So we’ve installed TFS 2010, and now the company is starting to pick up the pace with all types of users performing different roles.  So far, most of our modifications to the process template have been cosmetic, like moving tabs around, or adding fields.  A group of users came to us the other day, asking why the history tab has comments interwoven with the historical changes.  At that point all I could say is “Whatever you say in the past is history man.”  No, I didn’t say that, but it did get me thinking why there isn't a clear way to view the comments in chronological order. 

In comes the Custom Control.  A custom control is a way to extend the process template in a way you see fit.  I definitely wouldn’t jump to using this as my first choice but in this case it fits.  Our end result would be another tab next to the history tab called “Comment History”, and in the tab would be a readonly window displaying only the comments from the work items history.  Before I start, I would like to list all the sites I used in researching this, as I didn’t just pull this out of a black hat.

One of the key items which I will discuss which isn’t found in these threads is a way keep you work item layout xml to a minimum.

NOTE: You should do all this work on the TFS server as it will make referencing certain DLLs much easier.

1.  Open Visual Studio 2010, create 2 new class library projects, one called WitCustomControls, and one called WitCustomControls.WebAccess.  Set both projects to .NET 3.5.  The reason why we have 2 libraries will become clear in a bit.

2.  In the WitCustomControls library, add a windows form User Control called CommentHistoryControl.  In the the WitCustomControls.WebAccess create a class called HistoryCommentControl.  For each project, create a file called HistoryCommentControl.wicc (this is a work item custom control file), and a class called WorkItemHistoryComment.  Right click the .wicc file and go to Properties; set the Build Action to Content (do this in both projects).  (NOTE: I know I’m doing a little duplicate coding here, but for the concept of the example I’m keeping it simple).  Remove any default class files like Class.cs.

image

3.  Let’s fill in the .wicc files real quick.  When the work item UI is loaded, whether it be in Visual Studio (winform) or team web access, the control that is referenced in the work item layout xml is searched for by that name, in our case HistoryCommentControl. The file defines the library and class to load to render the control.  Do the following:

  • In the WitCustomControls project .wicc file add:
<?xml version="1.0" encoding="utf-8" ?>
<CustomControl xmlns:xsi="http://www.w3.org/2001/XMLSchema-instance" xmlns:xsd="http://www.w3.org/2001/XMLSchema">
<Assembly>WitCustomControls.dll</Assembly>
<FullClassName>WitCustomControls.HistoryCommentControl</FullClassName>
</CustomControl>

  • In the WitCustomControls.WebAccess project .wicc file add:
<?xml version="1.0" encoding="utf-8" ?>
<CustomControl xmlns:xsi="http://www.w3.org/2001/XMLSchema-instance" xmlns:xsd="http://www.w3.org/2001/XMLSchema">
<Assembly>WitCustomControls.WebAccess.dll</Assembly>
<FullClassName>WitCustomControls.WebAccess.HistoryCommentControl</FullClassName>
</CustomControl>

4.  Now the references we will need to inherit and implement the IWorkItemControl interface.  This is a little tricky, part of the DLLs are from Visual Studio install, and the other part come from TFS install. 

For both projects you will need:

  1. C:\Program Files (x86)\Microsoft Visual Studio 10.0\Common7\IDE\ReferenceAssemblies\v2.0\Microsoft.TeamFoundation.WorkItemTracking.Client.dll
  2. C:\Program Files (x86)\Microsoft Visual Studio 10.0\Common7\IDE\PrivateAssemblies\Microsoft.TeamFoundation.WorkItemTracking.Controls.dll

For the WitCustomControls.WebAccess project you will need these additional ones:

  1. C:\Windows\assembly\GAC_MSIL\Microsoft.TeamFoundation.WebAccess.Controls\10.0.0.0__b03f5f7f11d50a3a\Microsoft.TeamFoundation.WebAccess.Controls.dll
  2. C:\Windows\assembly\GAC_MSIL\Microsoft.TeamFoundation.WebAccess.WorkItemTracking\10.0.0.0__b03f5f7f11d50a3a\Microsoft.TeamFoundation.WebAccess.WorkItemTracking.dll

5.  I created a helper class to group the comment history data.  In the WorkItemHistoryComment file for both projects, add the following:

public class WorkItemHistoryComment
{
public DateTime ChangedDate;
public string ChangedBy;
public string Comment;
}

6.  The real work happens because these controls implement an interface called IWorkItemControl.  Below shows the code needed to create the content for the controls display.  In a nutshell, because we implement the interface, we get a reference to the WorkItem.  From that we can iterate over the revisions of the work item and look at all the fields that were modified.  The comment that is associated with a work item is in the WorkItem.History property.  For the winform control I used a WebBrowser control docked in the control.  The core of what we were trying to accomplish is in the method ExtractCommentsFromWorkItem(…) and AppendHtmlCommentSection(…).

WitCustomControls user control code:

public partial class HistoryCommentControl : UserControl, IWorkItemControl
{
private IServiceProvider _serviceProvider;

public HistoryCommentControl()
{
InitializeComponent();
}

#region IWorkItemControl Members

public event EventHandler BeforeUpdateDatasource;

public event EventHandler AfterUpdateDatasource;

public void Clear() { }

public void FlushToDatasource()
{
// do nothing because this is a readonly control
}

public void InvalidateDatasource()
{
if (IsInitialized())
{
// fill in the text box
IEnumerable<WorkItemHistoryComment> comments = ExtractCommentsFromWorkItem(WorkItemDatasource as WorkItem);

if (comments.Count() > 0)
{
StringBuilder sb = new StringBuilder("<html><head>");

sb.Append("<style rel=\"stylesheet\" type=\"text/css\">body {font-family: Tahoma,Geneva,Arial,Helvetica,Sans-serif; font-size:0.8em; } .comment-title { font-weight:bold; background-color:#EEEEEE; } .comment { font-size:0.8em; }</style>");
sb.Append("</head><body>");

AppendHtmlCommentSection(comments, sb);

sb.Append("</body></html>");

// set web browser box
webBrowserCommentHistory.DocumentText = sb.ToString();
}
}
}

public System.Collections.Specialized.StringDictionary Properties { get; set; }

public bool ReadOnly
{
get { return true; }
set { }
}

public void SetSite(IServiceProvider serviceProvider)

{
this._serviceProvider = serviceProvider;
}

public object WorkItemDatasource { get; set; }

public string WorkItemFieldName { get; set; }

#endregion

private bool IsInitialized()
{
// this control doesn't need a field name becasue it's readonly
return (!IsDisposed
&& WorkItemDatasource != null);
}

private IEnumerable<WorkItemHistoryComment> ExtractCommentsFromWorkItem(WorkItem wi)
{
List<WorkItemHistoryComment> comments = new List<WorkItemHistoryComment>();

foreach (Revision rev in wi.Revisions)
{
foreach (Field f in rev.Fields)
{
// determine if this revision has a the history field changed
// if so and not empty show it
if (0 == string.Compare(f.Name, "History", true)
&& !string.IsNullOrEmpty(f.Value as string))
{
comments.Add(new WorkItemHistoryComment
{
ChangedBy = (string)rev.Fields["Changed By"].Value,
ChangedDate = (DateTime)rev.Fields["Changed Date"].Value,
Comment = (string)f.Value
});
}
}
}

return comments.OrderByDescending(c => c.ChangedDate);
}

private void AppendHtmlCommentSection(IEnumerable<WorkItemHistoryComment> comments, StringBuilder sb)
{
// help verbage
sb.Append("<div>To add a comment, use the History tab where the comment input is located.</div><br/<br/>");

// start container for comments
sb.Append("<div><div><table style=\"width:100%;table-layout:fixed;\" cellspacing=\"1\" cellpadding=\"0\"><tbody>");

foreach (WorkItemHistoryComment comment in comments)
{
// row that indicates comment header
sb.Append("<tr><td> <table style=\"width:100%;font-size:0.8em;\" cellspacing=\"0\" cellpadding=\"1\"> <tbody> <tr>");

// from TFS history header row onclick=\"_ctl00_c_we_ctl48_wc.onExpandCollapseChangeTitle(this);\"
// wish we could pigback on this collapsing behavior
sb.Append("<td width=\"16\" align=\"center\"><img border=\"0\" align=\"absMiddle\" style=\"width:18px;height:17px;cursor:pointer\" src=\"https://tfs.pcbancorp.com:8443/tfs/web/Resources/Images/minus.gif\"></td>");
sb.AppendFormat("<td class=\"comment-title\">{0} [{1}]</td>", comment.ChangedBy, comment.ChangedDate);
sb.Append("</tr> </tbdody> </table> </td></tr>");
// row that represents the actual comment
sb.AppendFormat("<tr class=\"comment\"><td><div>{0}</div></td></tr>",
comment.Comment);
}

// finish container for comments
sb.Append("</tbody></table></div></div>");
}
}

WitCustomControls.WebAccess user control code:

public class HistoryCommentControl : BaseWorkItemWebControl

public HistoryCommentControl()

: base(HtmlTextWriterTag.Div) { }

public System.Web.UI.HtmlControls.HtmlGenericControl HtmlControl { get; protected set; }

public override void InitializeControl()
{
base.InitializeControl();

// Create control
EnsureInnerControls();
}

public void EnsureInnerControls()
{
if (HtmlControl != null)
return;

HtmlControl = new System.Web.UI.HtmlControls.HtmlGenericControl("div");

base.Controls.Clear();
base.Controls.Add(HtmlControl);
}

public override void InvalidateDatasource()
{
base.InvalidateDatasource();

EnsureInnerControls();

// set control value
IEnumerable<WorkItemHistoryComment> comments =
ExtractCommentsFromWorkItem(this.WorkItemDatasource as WorkItem);

if (comments.Count() > 0)
{
StringBuilder sb = new StringBuilder();

// get html with comments embedded
AppendHtmlCommentSection(comments, sb);

// set contents of html control
HtmlControl.InnerHtml = sb.ToString();
}
}

public override void FlushToDatasource()
{
base.FlushToDatasource();

HtmlControl.InnerHtml = string.Empty;
}

private IEnumerable<WorkItemHistoryComment> ExtractCommentsFromWorkItem(WorkItem wi)
{
List<WorkItemHistoryComment> comments = new List<WorkItemHistoryComment>();

foreach (Revision rev in wi.Revisions)
{
foreach (Field f in rev.Fields)
{
// determine if this revision has a the history field changed
// if so and not empty show it
if (0 == string.Compare(f.Name, "History", true)
&& !string.IsNullOrEmpty(f.Value as string))
{
comments.Add(new WorkItemHistoryComment
{
ChangedBy = (string)rev.Fields["Changed By"].Value,
ChangedDate = (DateTime)rev.Fields["Changed Date"].Value,
Comment = (string)f.Value
});
}
}
}

return comments.OrderByDescending(c => c.ChangedDate);
}

private void AppendHtmlCommentSection(IEnumerable<WorkItemHistoryComment> comments, StringBuilder sb)
{
// help verbage
sb.Append("<div>To add a comment, use the History tab where the comment input is located.</div><br/<br/>");


// start container for comments

sb.Append("<div class=\"tswa-compositectrl\"><div class=\"tswa-historyctrl-changeshost\"><table style=\"width:100%;table-layout:fixed;\" cellspacing=\"1\" cellpadding=\"0\"><tbody>");


foreach (WorkItemHistoryComment comment in comments)

{

// row that indicates comment header

sb.Append("<tr><td> <table width=\"100%\" cellspacing=\"0\" cellpadding=\"1\"> <tbody> <tr class=\"tswa-historyctrl-revhead\">");

// from TFS history header row onclick=\"_ctl00_c_we_ctl48_wc.onExpandCollapseChangeTitle(this);\"

// wish we could pigback on this collapsing behavior

sb.Append("<td width=\"16\" align=\"center\"><img border=\"0\" align=\"absMiddle\" style=\"width:18px;height:17px;cursor:pointer\" src=\"https://tfs.pcbancorp.com:8443/tfs/web/Resources/Images/minus.gif\"></td>");

sb.AppendFormat("<td>{0} [{1}]</td>", comment.ChangedBy, comment.ChangedDate);

sb.Append("</tr> </tbdody> </table> </td></tr>");

// row that represents the actual comment
sb.AppendFormat("<tr><td><div class=\"tswa-historyctrl-description\">{0}</div></td></tr>",
comment.Comment);
}

// finish container for comments
sb.Append("</tbody></table></div></div>");
}
}

7.  Now that we have our libraries created, we have to package them up so they can be installed in the correct location.  We at the point of understanding why we created 2 libraries.  When Visual Studio opens it loads the control from C:\Documents and Settings\All Users\Application Data\Microsoft\Team Foundation\Work Item Tracking\Custom Controls\10.0 and when TFS web access loads the control it does it from %ProgramFiles%\Microsoft Team Foundation Server 2010\Application Tier\Web Access\Web\App_Data\CustomControls.  Because of this, we will create a setup package that will install our libraries in different locations, the winform control will go in the all user’s app data, and the web control will go in the TFS web application folder. 

Create 2 setup projects (found in Other Project Types^Setup and Deployment^Visual Studio Installer^Setup Project).  One call WitCustomControlsSetup (for the 32-bit version) and one called WitCustomControlsSetup.x64 (for the 64-bit version).  The key difference is that on the 64-bit version, the files need to go in the 64-bit program files directory.  Both will follow the steps below and I will note when the 64-bit version differs.

a.  Right click the setup project and select View^file System.  Create the folder TWAAppDataFolder, the Application Folder will already exist.

b.  Select the Application Folder.  Right click in the output area and add the WitCustomControls libraries project output, repeat this and add it’s Content output as well.
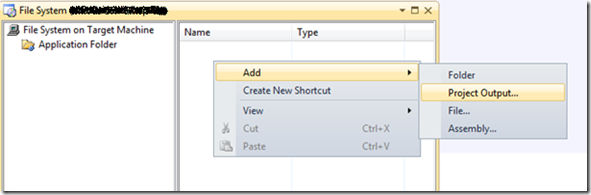
image

c.  Select the TWAAppDataFolder.  Like before, right click in the output area and add the WitCustomControls.WebAccess libraries project output, repeat this and add it’s Content output as well.  The final should be similar to the following.

image

d.  Now right click on the Application Folder and select Properties Window. Set the DefaultLocation value to [CommonAppDataFolder]\All Users\Application Data\Microsoft\Team Foundation\Work Item Tracking\Custom Controls\10.0.  Right click on the TWAAppDataFolder and go to the properties.  Set it’s DefaultLocation to [ProgramFilesFolder]\Microsoft Team Foundation Server 2010\Application Tier\Web Access\Web\App_Data\CustomControls (IMPORTANT: on the 64-bit setup project replace [ProgramFilesFolder] with [ProgramFiles64Folder]).

image

e.  Set the project property InstallAllUsers and RemovePreviousVersion to true.

f.  For the 64-bit version, you must change the setup projects property TargetPlatform to x64.

g.  Remove the TFS DLL dependencies.

image

8.  Install the 64-bit version on your TFS server.  Install the 32/64 –bit on any client machines you want this control to be used in by Visual Studio.

9.  The very last thing we need to do is modify our work item xml file and add our new control to the layout section.  The reason we have 2 libraries and 2 wicc files is so we don’t have to duplicate our layout setup for winform and web access.  If we didn’t we’d have to use the <Layout Target=”Web”> and <Layout Target=”WinForm”>, which is a pain.  Below is the tab I added to our work item layout.  Notice the Type attribute, this is the same name as the wicc file, and there lies the magic of it all!

<Tab Label="Comment History">
<Control Type="HistoryCommentControl" Label="" LabelPosition="Top" Dock="Fill" />
</Tab>

Automate Work Item Modification To Team Projects

I’ve successfully rolled out a full implementation of TFS at the company I work for and it’s been very smooth and rewarding.  The best part was that we spent time with the company and determined their work flows which we then used to created a process template to fit company not the company trying to fit an existing template.  As always, you need to tune it slightly as you start to use it.  As we’ve added more team projects and a few team collections, one thing we quickly realized is that updating team project with modified work item definitions needed to be automated.  Luckily there is most of the leg work was done for us already provided by this blog Deploying Process Template Changes Using TFS 2010 Build which contains the build process template.  Below I provide the steps we went through to achieve the desired results.

NOTE: We stored this automated build in a team project called TFS.  The team project was a source control repository for all of our team project process templates.

1.  Ensure that your TFS build service account (we kept it simple and had an AD account tfsbuild) is part of the Team Foundation Administrators group; this is done at the Application Tier level in the TFS administration console.  See article Managing Global Lists for Work Item Types [witadmin] for the reason why.

2.  Create a new build definition and give it a meaningful name, we named it to be that of the team project collection since all our team projects in most collections used the same process template.

3.  Set the workspace location, this will be the version control folder that contains your process template.  This will be a path like: $/TFS/ProcessTemplates/Test/My Template/Process Template.

image

4.  Define a drop location for you build items.  It will be a UNC path like.

image

5.  On the process tab set the process template to the ProcessTemplateDeploymentTemplate.xaml.  If this process template is not in the list,  you need to use the New button to select this existing template like $/TFS/BuildProcessTemplates/ProcessTemplateDeploymentTemplate.xaml.

image

6.  Fill in the required build process parameters.

  • Team Projects: this is a string list of team project names contained within the collection being updated.
  • TFS Server Collection URL: enter in the TFS url for the team collection being updated.  This will be like: https://tfs.pcbancorp.com:{port}/tfs/{Team Project Collection Name}. 
  • Work Item Type Definition Files:  a list of the work item type definition files which will be updated.  NOTE:  This list must be in the same order as the type name list defined in the step next bullet.
  • Work Item Type Name:  a string list of work item type names.  This must be in the same order as the file list defined in step previous bullet

image

7.  Save the build definition.

8.  Ensure that the [{TeamCollectionName}]\Project Collection Build Service Accounts role has the following permissions:

  • For the team collection the following highlighted permissions.

image

  • For each team project that is to be updated.

image

9.  You can now queue this build and watch your team projects within the given project collection updated with you process template changes!  Man, that beets manual work.

Connecting to TFS Preview : Visual Studio and Eclipse

Overview

Lately I’ve been working personal project here at home that requires both Visual Studio and Eclipse.  I was pleased when TFS 2010 came out and Teamprise (now Team Explorer Everywhere) had a seamless integration with TFS 2010, the experience is identical to that in Visual Studio.  One thing I grow old of is managing data from the personal projects or even small company projects that don’t need the hassle of installing, maintaining,and backing up an installation of TFS, especially at home.  When Microsoft introduced there TFS 2010 SaaS in the cloud, I was very anxious to try it out.  I was fortunate enough to get a taste thanks to Brian Harry.

Solution

In order to connect to your X.tfspreview.com account with Visual Studio or Eclipse you will have to do the following.

Visual Studio

1.  Ensure you have Visual Studio SP1 installed.

2.  Ensure you have hotfix KB2581206 installed.

3.  Now when you add a server like you normally would in the Team Explorer window you will get the following when going to connect.

image


Eclipse

1.  Ensure you have Team Explorer Everywhere 11 Developer Preview installed.  There is one caveat unfortunately.  There is a bug with this where it will not work for Windows XP running on 32-bit system (Arg!  I was a bit bummed at this as this is the dinosaur that I have; here is the issue I get).

2.  Now when you add a server like you normally would in the Team Explorer window.


Build Server

If you want to have a build server that talks to tfspreview you will need to install the latest for the preview as well, Web Installer or ISO.

Web Deploy 2.0 Setup Using TFS 2010 Builds

I have a previous blog post about setting up WebDeploy 1.0, which works well but 2.0 has more management features.  Despite the added management features, setting up version 2.0 seemed to be a bit more daunting.  One thing i noticed is that there isn’t much documentation out there but there are a lot of people blogging and posting on it.  In this thread I will summarize what I found was needed to get it working correctly for TFS 2010 or Visual Studio 2010.

Configuring Your IIS 7 Server

We’re using 2008 Server so the screen shots below will be from IIS 7. 

1.  Make sure the IIS Management Service is installed.  Go to Server Manager and add the Role Service as show below.

image

2.  Install the WebDeploy 2.0.You can download the platform version from here x86 or x64, 2008 uses x64.  NOTE:  Something that I ran into which seems to be a bug in the installer is that it missing installing a needed component.  To fix this you first install it then run the installer again but the second time you select Change which will then show you the extra item that wasn’t present the first time.  The installer should look like the image below, the highlighted section is what showed up the second time I ran the installer.  You must have all these components.

image 

3.  Go into IIS manager (Start^Run then type inetmgr).  Here you will need to configure a few items.  Select you server from the the connection dialog on the left.  You will be working in the Management section of the screen.

image 

4.  In the Management section, double click Management Service Delegation.  Once the delegation screen has come up you will want to add some new Rules.  In the upper right click Add Rule.  The rule that I needed was “Deploy Applications with Content” but you can add other predefined rules if needed.  I’ve found that the delegation providers I needed were “contentPath, iisApp, setAcl, createApp”.

image

The only thing I set on the rule was which type of user was going to connect to do the deployment.  In my case it was a specific AD account but it can be and IIS account.

image

5.   Go back to the Management home screen show in step 3.  This time double click Management Service.  In order to make changes you must stop the service first, which can be done on the right navigator.  The items that you want to take not for configuration are highlighted below.  Ensure that he check box “Enable remote connections” is checked.  The default port the service listens on is 8172, which I left.  By default the the install of the Management Service creates a self signed certificate.  I chose to create my own and use that.  Make sure the service is started before leaving this dialog (you can also find service is services applet with name “Web Management Service”).

image

NOTE:  If you enterprise uses a firewall, the call to the management service may not work.  You can check by going into a browser and navigating to https://youserver:8172/msdeploy.adx, if you are prompted for credentials it’s working otherwise the firewall is blocking it.

6.  This completes the IIS setup.


TFS Build Setup

Now that IIS is configured for remote deploy, we can create a build definition to deploy our web application to.  This is much like the previous blog post on setting up the parameters.  I’m going to skip all some of the attributes of the build definition as they don’t apply to making the WebDeploy work.

1.  Within your project in Team Explorer, right click Builds and select New Build definition.  Setup the basic build information:

  • General: build definition
  • Triggers: whatever triggers you want for this build
  • Workspace: select the workspace for the build
  • Build Defaults: select a build controller and drop location
  • Retention Policy: set any retentions you want

2.  The part that gets the web deploy working is in the Process section.  Expand all the numbered sections so you can see the attributes that need to be set.  First set the “Items to Build” which will specify the build flavor (i.e. Debug, Release, etc.) and the Solution/Project that represents you web application that you are deploying.

image

3.  The most critical piece is the MSBuild Arguments shown in the image above.  Unfortunately the arguments for Web Deploy are not well documented, but the ones below worked for my configuration.  You may have to grant you user permissions on the IIS machine to folders which pertain to you deployment, see this other good thread on configuration web deploy, Configuring MSDeploy in IIS 7.

/p:DeployOnBuild=True

/p:DeployTarget=MsDeployPublish

/p:CreatePackageOnPublish=True

/p:DeployIisAppPath="My Web Site Name"

/p:MsDeployServiceUrl=MyServerName:8172/msdeploy.axd

/p:username=MyUserName

/p:password=MyPassword

/p:AllowUntrustedCertificate=True

4.  Save the build and queue it.

TFS 2010 Web Deploy Unauthorized Operation During Build

I’ve been working on using web deploy to automate our builds of some particular web sites we have built internally.  I’m using Web Deploy 2.0, IIS 7.5, and TFS 2010.  It’s been working fine until today when we get this message:

C:\Program Files (x86)\MSBuild\Microsoft\VisualStudio\v10.0\Web\Microsoft.Web.Publishing.targets (3847): Web deployment task failed.  An error occurred when the request was processed on the remote computer. Failed to invoke or execute createApp provider on the web server.  The Web Deployment Tool’s createApp provider is either not enabled or failed to executed specific commands on the server.  Please contact your server administrator for assistance. (Web Deploy Provider is "createApp"). Error details: An error occurred when the request was processed on the remote computer. Attempted to perform an unauthorized operation. createApp http://go.microsoft.com/fwlink/?LinkId=178034

I search around and found that “createApp” is one of the Providers in the IIS Manage Service Delegations (see image below).  Initially when I was setting up web deploy I was following someone blog post on this and their recommendation was using “contentPath, iisApp, setAcl” which worked until today.  When I added “createApp” it fixed the issue.  See my blog on setting up web deploy.

image

Using SSL and TFS 2010 for Reporting Services All-In-One Install

A current deployment I’m working on for TFS requires that everything use SSL, which includes the TFS part and SQL Reporting Services (SSRS) reports (report manager/report web services).  We are diving into customization on some of the reports and someone mentioned that our Reports folder in Visual Studio has a red X on it (see below).

image

Everything else with regard to TFS was working fine over SSL, we could even access the report manager for SSRS, so I knew it had to be some in TFS that drove Visual Studio and the link in the Team Web Access.  Follow the steps below to fix this predicament.

1.  Log on to your TFS server and open the TFS administration console.
2.  Select the Reporting node in the left navigator

image

3.  Click the Edit link on the right side of the screen.  It will ask if you want to stop the schedule jobs, click OK.  A dialog with 3 tabs will come up.  Select the Reports tab.  In this tab, set the Web Service and the Report Manager to the SSL base URLs that represent your SSRS installation, for example https://tfs.mytfsmachine.com.  Note that once you change the Web Service url you will have to re-enter the data source user’s password.  Once you have update the fields, click OK.  See the image below.

image

4.  Start the jobs again by clicking “Start Jobs” on the right.  You are done.

To check that it all works go into Visual Studio and connect to your TFS server.  The red X should be gone from a team project’s Reports folder.  Also check you Team Web Access (https://{your dns name}/tfs/web/) to make sure that the link to the reports from the web page correctly uses the SSL url.

TFS 2010 Build and Deploy with Web Deploy

It hasn’t been until recently that I’ve messed around with some of the web application deployment tools Visual Studio and TFS have to offer.  So I started with the one click publish which you can find in Visual Studio when you have your web application highlighted.  It’s really cool that you can deploy to a web server directly from Visual Studio, but what’s even cooler is that you can utilize the same process in a TFS build with little work at all!  Below shows the simple steps to creating a build definition that will deploy your web application.

1.  Install Web Deploy on the IIS server you wish to deploy to. http://go.microsoft.com/?linkid=9684516 for x86 or http://go.microsoft.com/?linkid=9684517 for x64.  This is used to remotely install you web application and configure any IIS settings.  NOTE:  I recently ran into some issues with installing this where it doesn’t install all the necessary components.  If you reinstall it and select Change, you may find that all component where not installed.  If you are running into issues with permissions during web deploy see this thread http://william.jerla.me/post/2010/03/20/Configuring-MSDeploy-in-IIS-7.aspx.

2.  Create a new build definition.  This can be found on the Team Explorer windows, and right clicking the Builds folder.

3.  Set a drop location for the build output.

image

4.  Set the following MSBuild Arguments. These are required for the web deploy build target. These are space separated build parameters. Four of them you must provide information for.  If you don’t provide information about username password, I believe it will use the build agent’s process identity.

/p:DeployOnBuild=True

/p:DeployTarget=MsDeployPublish

/p:MSDeployPublishMethod=RemoteAgent

/p:CreatePackageOnPublish=True

/p:DeployIISAppPath={Site/application}

/p:MsDeployServiceUrl={You IIS Server Running Web Deploy Agent}

/p:UserName={Username}

/p:Password={Password}

{Site/application} – the web sites name of application name under the site. An example of just the site would be “Default Web Sites”, or in the case of a application under a site then “Default Web Sites/MyApp”.

{You IIS Server Running Web Deploy Agent} – the server name of IP address of the IIS server that your deploying to. It will be running the Web Deploy Agent service.  For example, http://MyIISMachine or http://10.210.7.123.

{Username} – a username that has sufficient privileges on the report IIS server copy content and modify IIS metabase.

{Password} – password for the user

image

5.  You might have to place the build agent account in the Adminstrators group on the machine being deployed to.

6.  Save you build definition.  Now queue it and watch it run.

See also my post on Configure Click-Once Publisher in Visual Studio.

Getting Started With Eclipse And Team Explorer Everywhere

In a previous post, Install Team Explorer Everywhere 2010, I covered the installation of TEE, so now I’m going to cover connecting to a TFS team project collection. 

1.  To get started open the Team Foundation Server Exploring (TFS Explorer for short) perspective, this can be found in Window ^ Open Perspective ^ Other…clip_image002

Now your current windows should look like the screen shown below.  The icon used to add a TFS server connection is circled in red, which will be used in the next step.  If you’ve used TFS with Visual Studio, you’ll notice that the layout is nearly identical to what it is in Visual Studio.

clip_image002[7]

2.  To add the TFS server, click on the icon that is circled in the previous image. The “Add Existing Team Project” dialog will appear. This is where you add your TFS server (see image below). The advanced tab allows you to port settings, for example if you’re using SSL. Enter in the correct server URL, the default would be http://{server}:8080/tfs. Click Next.

clip_image002[9]

3.  Continuing from the server setup, you should be on the Team Project selection page. On the left pane is the team project collections list. Prior to TFS 2010, there could only be one project collection. On the right pane are the team projects within the collection. Select the team projects that you want view. Click Next.

clip_image002[11]

4.  Once it finishes querying TFS, the last window will appear showing any workspaces you have. Here I have one because I already created a workspace through Visual Studio. Select your workspace and click “Finish” if you have one else continue with this step to create one.

clip_image002[13].

If you don’t have a workspace defined, you can create one by using the “Add…” button. You will see the workspace dialog appear as shown below. By default the workspace name will be your machine name. In the working folder you must map a source folder to a local folder. In the Status column select Active from the options. In the Source Control Folder option, click the browse “…” icon to bring up the TFS source “Browse for Folder” dialog. Select the source path you want and click Ok. Now in the Local Folder column, select the browse “…” icon to pick local file path where you want the source to copy down to. Once done you can click Ok to finish creating workspace.

clip_image002[15]

5.  Now the Team Explorer should be filled in and some more sub-windows should appear (see image below). With a team project expanded double click the “Source Control” item, see red circled item. This will display the Source Control window. Below highlights the 3 main windows that I use on a regular basis.

    • Team Explorer: Contains a list of team project collections, and under each collection is a list of team projects. Items will show up based on what you have selected in your workspace.
    • Source Control: Shows a folder tree display of all available branches to you. Navigating these you will be able to see whatever you have checked in to these branches.
    • Pending Changes: This shows a list of any pending changes that you have checked out. You can also check the items in from this pain as well, shelve/unshelve, associated check-in with work items, etc.

clip_image002[17]


And that’s it, you are now ready to check in/out your project files to TFS and take advantage of the integrated features of TFS such as bug tracking and shelving.  Shelving is a neat feature of TFS that allows you place your code on a virtual “book shelf” with some name so at some later date you can retrieve this named “book” of code from the shelf.  This is very useful if your working on a large feature and you have files checked out for more than a day.  At the end of the day you can shelve the code, which stores your changes on the server.  If your machines dies for some odd reason, all your hard work is not lost.  You can also share you shelved items with other team members.  For details of shelving see, Walkthrough: Shelving Version Control Items.

Install Team Explorer Everywhere 2010 For Eclipse

Typically shops using Eclipse will probably be using SVN or some other source control system, but there are cases where you shop may be a mix of coding languages.  Team Foundation Server is a good offering for source control and much more, such as bug tracking, project management, etc.  If you are in such a shop, Teamprise, which is now owned by Microsoft, wrote a plugin for Eclipse that will connect to Team Foundation Server.  I will describe how to install this plugin for Eclipse in the below steps.  I’m basing my example off the Ganymede installation of Eclipse.

1.  Download TFSEclipsePlugin-UpdateSiteArchive-10.0.0.zip.  Unpack zip file into C:\Tools. You should have C:\Tools\TFSEclipsePlugin-UpdateSiteArchive-10.0.0.

2.  In Eclipse, open the menu Help ^ Software Updates… On other flavors of Eclipse this maybe Help ^ Install New Software.

3.  In the Available Software tab, click the button “Add Site…”. In the “Add Site” dialog, click the “Local…” button, which will bring up a folder dialog. See the screen below. Select the folder C:\Tools\TFSEclipsePlugin-UpdateSiteArchive-10.0.0 which is what was unpacked earlier. Click Ok in folder dialog, then click Ok in “Add Site” dialog.

clip_image002[4]

4.   Now you should see the plugin available in your “Available Software”. Check the Visual Studio Team Explorer Everywhere 2010 checkbox and click the “Install…” button. It will chug through some requirements calculations for a second or two.

clip_image002[6]

5.  After it’s done checking dependencies, an Install dialog will appear as shown below. Click Next button, accept the license agreement, and then click Finish button. After it’s done it will suggest that you restart eclipse, so do that now.

clip_image002[8]


In upcoming blogs I will be talking about the usage of this plugin with respect to TFS.

Using VS2008 VS2005 with TFS 2010 Compatibility

The other day I was trying to setup a TFS 2010 server to demo it’s usage.  Since most of the developers using are VS2010, I didn’t have any issues showing them how to connect. But when it came to some designers that needed BIDS (VS2008) for creating reports for Reporting Services, I ran into some bizarre issues.  One of the main issues is that TFS 2010 uses project collections, which is new, and older clients need some backwards compatibility fixes.

Problem: Older versions of Visual Studio will not connect to TFS 2010.  You might get authentication or server unavailable errors.

Solution:  Install the backwards compatibility patches for you version of Visual Studio.  Below shows the steps to take to get your version of VS connected

1.  Install Visual Studio service pack:

VS2008 SP1: http://www.microsoft.com/downloads/details.aspx?FamilyId=FBEE1648-7106-44A7-9649-6D9F6D58056E&displaylang=en

VS2005 SP1: http://www.microsoft.com/downloads/details.aspx?FamilyId=BB4A75AB-E2D4-4C96-B39D-37BAF6B5B1DC&displaylang=en

2.  Install Team Explorer if you need it:

VS2008: http://www.microsoft.com/downloadS/details.aspx?familyid=0ED12659-3D41-4420-BBB0-A46E51BFCA86&displaylang=en

VS2005: http://www.microsoft.com/downloads/details.aspx?FamilyID=46473C2A-BB85-4461-BB27-4792A5DEF222&amp;displaylang=ja&displaylang=en

3.  Install VS forward compatibility for TFS:

VS2008: http://www.microsoft.com/downloads/details.aspx?FamilyID=cf13ea45-d17b-4edc-8e6c-6c5b208ec54d&displaylang=en

VS2005: http://www.microsoft.com/downloads/details.aspx?FamilyID=22215e4c-af6f-4e2f-96df-20e94d762689&displaylang=en

4.  Since TFS 2010 has introduced the concept of project collections connecting to TFS by adding a server to the Team Explorer will not work like it used to.  You have to modify the registry and insert the connection to the server with this type of format:  http://{TFS Server}:8080/tfs/{CollectionName} (some of the default here are port and tfs server root folder name).  The reason you can just add this as a new server is that the server path does not allow the “/” character.

VS2008: Enter a new string value at this key location “HKEY_CURRENT_USER\Software\Microsoft\VisualStudio\9.0\TeamFoundation\Servers”.  The key name can be the name of you tfs project collection if you want.  The key I added for my project demo was http://d01teamweb/tfs/DefaultCollection with a key name DefaultCollection.

VS2005: Enter a new string value at this key location “HKEY_CURRENT_USER\Software\Microsoft\VisualStudio\8.0\TeamFoundation\Servers”.  The key name can be the name of you tfs project collection if you want.  The key I added for my project demo was http://d01teamweb/tfs/DefaultCollection with a key name DefaultCollection.

You’ll need to reopen any existing VS instances that need to pick up this information.  Once you open VS and go to the Team Explorer window, you should see the project collection you added to the registry.  Since 2005/2008 don’t handle project collection, they can only work with one at a time.