Showing posts with label IDE Tools. Show all posts

Quick Way To Create a MSI For You Web Projects Using Wix

I’ve know about Wix (Windows Install Xml) tool set for quite some time but haven’t had much to do with it.  Wix is a great tool for working within the Windows environment.  It is a XML based way of defining how you want you MSI packaged.  It comes with Visual Studio template projects, and few very useful tools.

Background of my problem to solve: My company has been using Web Site projects and Visual Studio Deployment/Setup projects for a very long time.  I know, all these project types are the bane of Visual Studio’s ease of use when it comes to projects.  Our requirement is to create MSI installers of our web services.

I’ll be assuming you are using a web application project type, web site projects are deprecated after Visual Studio 2010. Below are some simple steps you can take to create a MSI out of your web application projects.

NOTE: One thing about Wix that helps a lot, is consistent naming convention for items that are not auto-generated, for example, IIS virtual directory component IDs ending in “.VDir” or folder IDs ending in “Folder”.

1.  Install the latest Wix Toolset, http://wixtoolset.org/.  To save yourself time, add the the Wix bin (something like C:\Program Files (x86)\WiX Toolset v3.8\bin) folder to your PATH environment variable so the tools can be accessed on the command line.

2.  Go to you web application.  Right click and select Publish.  You will be just publishing to a local folder so if you have other publishing profiles create a new one, call it LocalFolder or something like that.  The publishing properties should look like the following.

image

3.  Create a Wix project in the same solution of the web application project.

4.  Add the web application project as a reference in the Wix project as shown below.  Yes, Wix has build dependencies, it’s pretty cool!

image

4.  Now we will create a component wix file, a file defining all of our project outputs we want in our MSI (i.e. dlls, asmx, etc.).  Below is the following line I’ve used to quickly generate a wix file, which usually doesn’t need much tweaking after it’s done.

heat dir "C:\Temp\HtngWebServices" -out "{PathToWhereYouWantYourWixFix}\Components.wxs" -gg -g1 -sreg -sfrag -var var.{ProjectName}.ProjectDir -dr WebServicesFolder -cg HtngWebServicesComponents

dir = directory which you will pull files from to generate wxs file

out = the location you want to create the wxs file in, generally this will be your Wix project or a Wix setup library project.

var = variable to place in front of the file location of the file being referenced in wix, this will be apparent when I describe the how the Wix project references work below.

dr = Directory reference to root directories, see Wix documentation.

gg, g1, sreg, sfrag = see Wix documentation.

5.  Once the Components.wxs is generated (Compnonents.wxs is just a name I choose for simplicity of example), add it to the Wix project. 

Opening the Components.wxs that was generated by “heat”, you’ll notice a line like “Source="$(var.HtngWebServices.ProjectDir)\Web.config".  The part I’ve italicized is a variable, see Using Project References and Variables, is a project ref so when our dependent project builds all the files we need will be located by Wix, this is handy but may not fit everyone’s situation.

image

6.  In the Wix project, add the following Wix library references, which are found in C:\Program Files (x86)\WiX Toolset v3.8\bin\.

image 

At the top of your Product.wxs file you will need to add the following XML namespaces.

     xmlns:iis="http://schemas.microsoft.com/wix/IIsExtension"      xmlns:util="http://schemas.microsoft.com/wix/UtilExtension"

7.  Add a wix file (.wxs) to your Wix project called IISConfiguration.wxs.  This is where the IIS settings will go.

8.  In the IISConfiguration file you will need to add DirectoryRef for virtual directories that you need.  See the IIS documentation for detail, below is what It looks like

image

9.  You will need to add feature(s) to the Product.wxs file that was generated with the project.  Here we’ve used 2 features, see Feature documentation.  Each of the ComponentRef under the IIS virtual directories section shown below will be linked to the next step, and the item circled in read represents the ComponentRef of our web application project components and virtual director.

image

10.  A few more fragments will need to be added to you Product.wxs file to complete the installation information that the MSI will need.  Below is a shot of these sections.

First Fragment – this is for IIS extension to know what web site your are targeting, see IIS extensions.

Second Fragment – the first directory structure is the “TARGETDIR” directory which are constants from MSI framework, see MSDN, the rest is nesting for our installation location.  The other DirectoryRef towards the bottom is for permissions for IIS process to access the installed folders.

image


To be honest the learning curve is a little steep for Wix at first but once you wrestle it down, you begin to be able to follow what is going on.  The best guide is their documentation http://wixtoolset.org/documentation/ and Google other examples of specific tasks you are trying to achieve.  This thread is a accumulation of such time spent Googling various specifics of “how-to”’.

What is a .winmd and how to use it in a desktop application

A .winmd is a file used by Windows 8 WinRT (Windows Run Time).  winmd stands for Windows Meta Data file which is the same format used by the .NET framework for the CLI (common language interface).  As such it can be viewed by .NET tools such as Reflector and the ildasm tool packaged with .NET.  You can find these files in various places but one command place is c:\Windows\System32\WinMetadata.

These files are focused on Windows store apps but it doesn’t preclude you from using them in a traditional desktop app.  To do so you need to do the following to your desktop application in order to leverage functionality in these APIs.

1.  Unload your application.  Edit the project file and add the tag near target version, “<TargetPlatformVersion>8.0</TargetPlatformVersion>”.

2.  Reload your project.  You will need to add a reference to the following DLLs.

C:\Program Files (x86)\Reference Assemblies\Microsoft\Framework\.NETFramework\v4.5\WindowsBase.dll

C:\Windows\Microsoft.NET\Framework64\v4.0.30319\System.Runtime.dll

C:\Windows\Microsoft.NET\Framework64\v4.0.30319\System.Runtime.WindowsRuntime.dll

3.  Now you will be able to leverage functionality provided by the WinRT framework, such as camera, NFC, etc.

Using WPF and Vector Graphics

Recently I’ve been taking a look at WPF, Microsoft’s not so new now replacement for WinForms.  With the little free time that I have, I’ve relied heavily on Pluralsight for getting up to speed on various technologies.  In working with WPF, I was trying to leverage their concept of “lookless” controls which is very powerful and much nicer to design with than WinForms. 

To summarize my tribulations, I was having a hard time loading a local resource that was a SVG.  Blend Expression, a WPF designer, doesn’t support SVG directly but it does support .pdf (a form of SVG) and .ai (Adobe Illustration).  There are a couple of ways to product .pdf or .ai files.  My approach was to use a tool I’ve used in the past, Inkscape, see Inkscape A Cool Tool.  Inkscape also support generating a XAML file directly from the SVG file which you can leverage directory or copy the contents of XAML output into a resource dictionary.

1.  Open or create your SVG file in Inkscape.

2.  PDF format: Select Save As and choose .pdf format.  It will display a dialog as below once you click Save, ensure you select “Convert texts to paths”, then click OK.  Once the file is saved you can rename the file extension from .pdf to .ai.  It will now be recognized in Expression Blend.

image


3.  XAML format:  Select Save As and choose .xaml format.  This will export it directly to a XAML file.  You can take the content line, element is a ViewBox, and put that directory in a resource file.

Sass CSS with Compass using Grunt Not Working on Windows

My team is using AngularJS, Node.js, Grunt, Sass CSS via Compass, Yoeman, and a few other web toolsets.  The other day when running the serve process to generate the css output from Sass CSS, the css wasn’t able to generate.  It turned out that Compass was setting the permissions on the .tmp folder where it puts the CSS to a state that didn’t all the process to write the file, hence a Permission Denied error.  To fix this issue I followed the StackOverflow thread http://stackoverflow.com/questions/22596760/yeoman-error-errnoeacces-on-line-897-of-c-permission-denied which did these steps.

Open a command prompt and run the following.

  1. gem uninstall sass (if you have multiple version, select all)
  2. gem uninstall compass
  3. gem install compass --pre
  4. gem install sass --pre

Setting Up PhoneGap/Cordova for Visual Studio

It’s always a struggle to find time to invest in side projects when you work and play an active role in your kids lives.  I appreciate when installing tools is just simple and you don’t have to google “why doesn’t …. do …” or “where is…” because the instructions aren’t straight forward or are missing steps/pieces.  I found this the case with the latest phonegap instructions as of 2014-3-9.

  1. Install Windows SDK.  I’m using Windows 7.1 because I have a Win7 machine, I found SDK here.  This installed Visual Studio 2010 Express for Windows Phone (VS2010).
  2. Download PhoneGap SDK and unzip in C:\Tools.  PhoneGap SDK is on github here.
  3. In the C:\Tools\phonegap-master (you might have to drill down a bit) there will be a lib folder, and in it there are folders for the different target frameworks one of which is “windows-phone”.  As of recent the Visual Studio template .zip is not there.  I had to run a batch filed called “createTemplates.bat” which created templates for WP8 and WP7.
  4. Once you have the Visual Studio .zip file template(s), copy those to your \Documents\Visual Studio 2010\Templates\ProjectTemplates\Visual C#.
  5. Open VS2010 and create a new project.  You will now see a project template as shown below.  The template name may change at some point.

image


The project structure will look like the following.

  • cordova – build tools
  • cordovalib – code for browser engine interaction
  • www – folder for html/js/css of your app
  • plugins – plugins for interfaces on your phone (i.e. camera, contacts)

image

Alter Visual Studio Template Files

Out of the box, I’ve found Visual Studio template files to be just fine.  Recently I was doing some researching into using StyleCop so I installed in on my machine.  Little did I know, it went behind the scenes and altered some if now all template files.  In particular, I don’t care for their Interface and Class file templates, I tend to use ReSharper and GhostDoc to do cleanup and documentation.  If you want to change or revert your templates, your in luck, Visual Studio has backups.  Follow the steps below to restore whatever templates you need to.  In the example I will be restoring the C# class file for Visual Studio 2010 (10.0).

1.  Go to the template folder you desire.  You will find the templates in the Program Files folder (Program Files (x86) on 64 bit system) and the particular version  here C:\Program Files\Microsoft Visual Studio {Version of VS, 10.0, 9.0…}\Common7\IDE\ItemTemplates.  In the case of the C# class you will have to drill down into \CSharp\Code\1033\ folder, and in there you will find a file called Class.zip.bak.  Delete the existing Class.zip file, copy the Class.zip.bak and rename it to Class.zip.  Do this process for any other templates you wish to revert.

2.  Reset the IDE environment.  Open a Visual Studio command prompt (I do it in administrator mode on Windows 7).  It’s found in All Programs^Microsoft Visual Studio {Version 2010, 2008,…}^Visual Studio Tools.  Once the command windows is open run “devenv /setup” and you’re all set!

Team Foundation Server Custom Controls

So we’ve installed TFS 2010, and now the company is starting to pick up the pace with all types of users performing different roles.  So far, most of our modifications to the process template have been cosmetic, like moving tabs around, or adding fields.  A group of users came to us the other day, asking why the history tab has comments interwoven with the historical changes.  At that point all I could say is “Whatever you say in the past is history man.”  No, I didn’t say that, but it did get me thinking why there isn't a clear way to view the comments in chronological order. 

In comes the Custom Control.  A custom control is a way to extend the process template in a way you see fit.  I definitely wouldn’t jump to using this as my first choice but in this case it fits.  Our end result would be another tab next to the history tab called “Comment History”, and in the tab would be a readonly window displaying only the comments from the work items history.  Before I start, I would like to list all the sites I used in researching this, as I didn’t just pull this out of a black hat.

One of the key items which I will discuss which isn’t found in these threads is a way keep you work item layout xml to a minimum.

NOTE: You should do all this work on the TFS server as it will make referencing certain DLLs much easier.

1.  Open Visual Studio 2010, create 2 new class library projects, one called WitCustomControls, and one called WitCustomControls.WebAccess.  Set both projects to .NET 3.5.  The reason why we have 2 libraries will become clear in a bit.

2.  In the WitCustomControls library, add a windows form User Control called CommentHistoryControl.  In the the WitCustomControls.WebAccess create a class called HistoryCommentControl.  For each project, create a file called HistoryCommentControl.wicc (this is a work item custom control file), and a class called WorkItemHistoryComment.  Right click the .wicc file and go to Properties; set the Build Action to Content (do this in both projects).  (NOTE: I know I’m doing a little duplicate coding here, but for the concept of the example I’m keeping it simple).  Remove any default class files like Class.cs.

image

3.  Let’s fill in the .wicc files real quick.  When the work item UI is loaded, whether it be in Visual Studio (winform) or team web access, the control that is referenced in the work item layout xml is searched for by that name, in our case HistoryCommentControl. The file defines the library and class to load to render the control.  Do the following:

  • In the WitCustomControls project .wicc file add:
<?xml version="1.0" encoding="utf-8" ?>
<CustomControl xmlns:xsi="http://www.w3.org/2001/XMLSchema-instance" xmlns:xsd="http://www.w3.org/2001/XMLSchema">
<Assembly>WitCustomControls.dll</Assembly>
<FullClassName>WitCustomControls.HistoryCommentControl</FullClassName>
</CustomControl>

  • In the WitCustomControls.WebAccess project .wicc file add:
<?xml version="1.0" encoding="utf-8" ?>
<CustomControl xmlns:xsi="http://www.w3.org/2001/XMLSchema-instance" xmlns:xsd="http://www.w3.org/2001/XMLSchema">
<Assembly>WitCustomControls.WebAccess.dll</Assembly>
<FullClassName>WitCustomControls.WebAccess.HistoryCommentControl</FullClassName>
</CustomControl>

4.  Now the references we will need to inherit and implement the IWorkItemControl interface.  This is a little tricky, part of the DLLs are from Visual Studio install, and the other part come from TFS install. 

For both projects you will need:

  1. C:\Program Files (x86)\Microsoft Visual Studio 10.0\Common7\IDE\ReferenceAssemblies\v2.0\Microsoft.TeamFoundation.WorkItemTracking.Client.dll
  2. C:\Program Files (x86)\Microsoft Visual Studio 10.0\Common7\IDE\PrivateAssemblies\Microsoft.TeamFoundation.WorkItemTracking.Controls.dll

For the WitCustomControls.WebAccess project you will need these additional ones:

  1. C:\Windows\assembly\GAC_MSIL\Microsoft.TeamFoundation.WebAccess.Controls\10.0.0.0__b03f5f7f11d50a3a\Microsoft.TeamFoundation.WebAccess.Controls.dll
  2. C:\Windows\assembly\GAC_MSIL\Microsoft.TeamFoundation.WebAccess.WorkItemTracking\10.0.0.0__b03f5f7f11d50a3a\Microsoft.TeamFoundation.WebAccess.WorkItemTracking.dll

5.  I created a helper class to group the comment history data.  In the WorkItemHistoryComment file for both projects, add the following:

public class WorkItemHistoryComment
{
public DateTime ChangedDate;
public string ChangedBy;
public string Comment;
}

6.  The real work happens because these controls implement an interface called IWorkItemControl.  Below shows the code needed to create the content for the controls display.  In a nutshell, because we implement the interface, we get a reference to the WorkItem.  From that we can iterate over the revisions of the work item and look at all the fields that were modified.  The comment that is associated with a work item is in the WorkItem.History property.  For the winform control I used a WebBrowser control docked in the control.  The core of what we were trying to accomplish is in the method ExtractCommentsFromWorkItem(…) and AppendHtmlCommentSection(…).

WitCustomControls user control code:

public partial class HistoryCommentControl : UserControl, IWorkItemControl
{
private IServiceProvider _serviceProvider;

public HistoryCommentControl()
{
InitializeComponent();
}

#region IWorkItemControl Members

public event EventHandler BeforeUpdateDatasource;

public event EventHandler AfterUpdateDatasource;

public void Clear() { }

public void FlushToDatasource()
{
// do nothing because this is a readonly control
}

public void InvalidateDatasource()
{
if (IsInitialized())
{
// fill in the text box
IEnumerable<WorkItemHistoryComment> comments = ExtractCommentsFromWorkItem(WorkItemDatasource as WorkItem);

if (comments.Count() > 0)
{
StringBuilder sb = new StringBuilder("<html><head>");

sb.Append("<style rel=\"stylesheet\" type=\"text/css\">body {font-family: Tahoma,Geneva,Arial,Helvetica,Sans-serif; font-size:0.8em; } .comment-title { font-weight:bold; background-color:#EEEEEE; } .comment { font-size:0.8em; }</style>");
sb.Append("</head><body>");

AppendHtmlCommentSection(comments, sb);

sb.Append("</body></html>");

// set web browser box
webBrowserCommentHistory.DocumentText = sb.ToString();
}
}
}

public System.Collections.Specialized.StringDictionary Properties { get; set; }

public bool ReadOnly
{
get { return true; }
set { }
}

public void SetSite(IServiceProvider serviceProvider)

{
this._serviceProvider = serviceProvider;
}

public object WorkItemDatasource { get; set; }

public string WorkItemFieldName { get; set; }

#endregion

private bool IsInitialized()
{
// this control doesn't need a field name becasue it's readonly
return (!IsDisposed
&& WorkItemDatasource != null);
}

private IEnumerable<WorkItemHistoryComment> ExtractCommentsFromWorkItem(WorkItem wi)
{
List<WorkItemHistoryComment> comments = new List<WorkItemHistoryComment>();

foreach (Revision rev in wi.Revisions)
{
foreach (Field f in rev.Fields)
{
// determine if this revision has a the history field changed
// if so and not empty show it
if (0 == string.Compare(f.Name, "History", true)
&& !string.IsNullOrEmpty(f.Value as string))
{
comments.Add(new WorkItemHistoryComment
{
ChangedBy = (string)rev.Fields["Changed By"].Value,
ChangedDate = (DateTime)rev.Fields["Changed Date"].Value,
Comment = (string)f.Value
});
}
}
}

return comments.OrderByDescending(c => c.ChangedDate);
}

private void AppendHtmlCommentSection(IEnumerable<WorkItemHistoryComment> comments, StringBuilder sb)
{
// help verbage
sb.Append("<div>To add a comment, use the History tab where the comment input is located.</div><br/<br/>");

// start container for comments
sb.Append("<div><div><table style=\"width:100%;table-layout:fixed;\" cellspacing=\"1\" cellpadding=\"0\"><tbody>");

foreach (WorkItemHistoryComment comment in comments)
{
// row that indicates comment header
sb.Append("<tr><td> <table style=\"width:100%;font-size:0.8em;\" cellspacing=\"0\" cellpadding=\"1\"> <tbody> <tr>");

// from TFS history header row onclick=\"_ctl00_c_we_ctl48_wc.onExpandCollapseChangeTitle(this);\"
// wish we could pigback on this collapsing behavior
sb.Append("<td width=\"16\" align=\"center\"><img border=\"0\" align=\"absMiddle\" style=\"width:18px;height:17px;cursor:pointer\" src=\"https://tfs.pcbancorp.com:8443/tfs/web/Resources/Images/minus.gif\"></td>");
sb.AppendFormat("<td class=\"comment-title\">{0} [{1}]</td>", comment.ChangedBy, comment.ChangedDate);
sb.Append("</tr> </tbdody> </table> </td></tr>");
// row that represents the actual comment
sb.AppendFormat("<tr class=\"comment\"><td><div>{0}</div></td></tr>",
comment.Comment);
}

// finish container for comments
sb.Append("</tbody></table></div></div>");
}
}

WitCustomControls.WebAccess user control code:

public class HistoryCommentControl : BaseWorkItemWebControl

public HistoryCommentControl()

: base(HtmlTextWriterTag.Div) { }

public System.Web.UI.HtmlControls.HtmlGenericControl HtmlControl { get; protected set; }

public override void InitializeControl()
{
base.InitializeControl();

// Create control
EnsureInnerControls();
}

public void EnsureInnerControls()
{
if (HtmlControl != null)
return;

HtmlControl = new System.Web.UI.HtmlControls.HtmlGenericControl("div");

base.Controls.Clear();
base.Controls.Add(HtmlControl);
}

public override void InvalidateDatasource()
{
base.InvalidateDatasource();

EnsureInnerControls();

// set control value
IEnumerable<WorkItemHistoryComment> comments =
ExtractCommentsFromWorkItem(this.WorkItemDatasource as WorkItem);

if (comments.Count() > 0)
{
StringBuilder sb = new StringBuilder();

// get html with comments embedded
AppendHtmlCommentSection(comments, sb);

// set contents of html control
HtmlControl.InnerHtml = sb.ToString();
}
}

public override void FlushToDatasource()
{
base.FlushToDatasource();

HtmlControl.InnerHtml = string.Empty;
}

private IEnumerable<WorkItemHistoryComment> ExtractCommentsFromWorkItem(WorkItem wi)
{
List<WorkItemHistoryComment> comments = new List<WorkItemHistoryComment>();

foreach (Revision rev in wi.Revisions)
{
foreach (Field f in rev.Fields)
{
// determine if this revision has a the history field changed
// if so and not empty show it
if (0 == string.Compare(f.Name, "History", true)
&& !string.IsNullOrEmpty(f.Value as string))
{
comments.Add(new WorkItemHistoryComment
{
ChangedBy = (string)rev.Fields["Changed By"].Value,
ChangedDate = (DateTime)rev.Fields["Changed Date"].Value,
Comment = (string)f.Value
});
}
}
}

return comments.OrderByDescending(c => c.ChangedDate);
}

private void AppendHtmlCommentSection(IEnumerable<WorkItemHistoryComment> comments, StringBuilder sb)
{
// help verbage
sb.Append("<div>To add a comment, use the History tab where the comment input is located.</div><br/<br/>");


// start container for comments

sb.Append("<div class=\"tswa-compositectrl\"><div class=\"tswa-historyctrl-changeshost\"><table style=\"width:100%;table-layout:fixed;\" cellspacing=\"1\" cellpadding=\"0\"><tbody>");


foreach (WorkItemHistoryComment comment in comments)

{

// row that indicates comment header

sb.Append("<tr><td> <table width=\"100%\" cellspacing=\"0\" cellpadding=\"1\"> <tbody> <tr class=\"tswa-historyctrl-revhead\">");

// from TFS history header row onclick=\"_ctl00_c_we_ctl48_wc.onExpandCollapseChangeTitle(this);\"

// wish we could pigback on this collapsing behavior

sb.Append("<td width=\"16\" align=\"center\"><img border=\"0\" align=\"absMiddle\" style=\"width:18px;height:17px;cursor:pointer\" src=\"https://tfs.pcbancorp.com:8443/tfs/web/Resources/Images/minus.gif\"></td>");

sb.AppendFormat("<td>{0} [{1}]</td>", comment.ChangedBy, comment.ChangedDate);

sb.Append("</tr> </tbdody> </table> </td></tr>");

// row that represents the actual comment
sb.AppendFormat("<tr><td><div class=\"tswa-historyctrl-description\">{0}</div></td></tr>",
comment.Comment);
}

// finish container for comments
sb.Append("</tbody></table></div></div>");
}
}

7.  Now that we have our libraries created, we have to package them up so they can be installed in the correct location.  We at the point of understanding why we created 2 libraries.  When Visual Studio opens it loads the control from C:\Documents and Settings\All Users\Application Data\Microsoft\Team Foundation\Work Item Tracking\Custom Controls\10.0 and when TFS web access loads the control it does it from %ProgramFiles%\Microsoft Team Foundation Server 2010\Application Tier\Web Access\Web\App_Data\CustomControls.  Because of this, we will create a setup package that will install our libraries in different locations, the winform control will go in the all user’s app data, and the web control will go in the TFS web application folder. 

Create 2 setup projects (found in Other Project Types^Setup and Deployment^Visual Studio Installer^Setup Project).  One call WitCustomControlsSetup (for the 32-bit version) and one called WitCustomControlsSetup.x64 (for the 64-bit version).  The key difference is that on the 64-bit version, the files need to go in the 64-bit program files directory.  Both will follow the steps below and I will note when the 64-bit version differs.

a.  Right click the setup project and select View^file System.  Create the folder TWAAppDataFolder, the Application Folder will already exist.

b.  Select the Application Folder.  Right click in the output area and add the WitCustomControls libraries project output, repeat this and add it’s Content output as well.
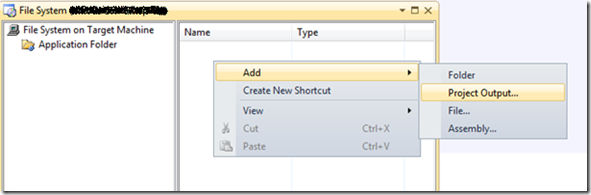
image

c.  Select the TWAAppDataFolder.  Like before, right click in the output area and add the WitCustomControls.WebAccess libraries project output, repeat this and add it’s Content output as well.  The final should be similar to the following.

image

d.  Now right click on the Application Folder and select Properties Window. Set the DefaultLocation value to [CommonAppDataFolder]\All Users\Application Data\Microsoft\Team Foundation\Work Item Tracking\Custom Controls\10.0.  Right click on the TWAAppDataFolder and go to the properties.  Set it’s DefaultLocation to [ProgramFilesFolder]\Microsoft Team Foundation Server 2010\Application Tier\Web Access\Web\App_Data\CustomControls (IMPORTANT: on the 64-bit setup project replace [ProgramFilesFolder] with [ProgramFiles64Folder]).

image

e.  Set the project property InstallAllUsers and RemovePreviousVersion to true.

f.  For the 64-bit version, you must change the setup projects property TargetPlatform to x64.

g.  Remove the TFS DLL dependencies.

image

8.  Install the 64-bit version on your TFS server.  Install the 32/64 –bit on any client machines you want this control to be used in by Visual Studio.

9.  The very last thing we need to do is modify our work item xml file and add our new control to the layout section.  The reason we have 2 libraries and 2 wicc files is so we don’t have to duplicate our layout setup for winform and web access.  If we didn’t we’d have to use the <Layout Target=”Web”> and <Layout Target=”WinForm”>, which is a pain.  Below is the tab I added to our work item layout.  Notice the Type attribute, this is the same name as the wicc file, and there lies the magic of it all!

<Tab Label="Comment History">
<Control Type="HistoryCommentControl" Label="" LabelPosition="Top" Dock="Fill" />
</Tab>

Automate Work Item Modification To Team Projects

I’ve successfully rolled out a full implementation of TFS at the company I work for and it’s been very smooth and rewarding.  The best part was that we spent time with the company and determined their work flows which we then used to created a process template to fit company not the company trying to fit an existing template.  As always, you need to tune it slightly as you start to use it.  As we’ve added more team projects and a few team collections, one thing we quickly realized is that updating team project with modified work item definitions needed to be automated.  Luckily there is most of the leg work was done for us already provided by this blog Deploying Process Template Changes Using TFS 2010 Build which contains the build process template.  Below I provide the steps we went through to achieve the desired results.

NOTE: We stored this automated build in a team project called TFS.  The team project was a source control repository for all of our team project process templates.

1.  Ensure that your TFS build service account (we kept it simple and had an AD account tfsbuild) is part of the Team Foundation Administrators group; this is done at the Application Tier level in the TFS administration console.  See article Managing Global Lists for Work Item Types [witadmin] for the reason why.

2.  Create a new build definition and give it a meaningful name, we named it to be that of the team project collection since all our team projects in most collections used the same process template.

3.  Set the workspace location, this will be the version control folder that contains your process template.  This will be a path like: $/TFS/ProcessTemplates/Test/My Template/Process Template.

image

4.  Define a drop location for you build items.  It will be a UNC path like.

image

5.  On the process tab set the process template to the ProcessTemplateDeploymentTemplate.xaml.  If this process template is not in the list,  you need to use the New button to select this existing template like $/TFS/BuildProcessTemplates/ProcessTemplateDeploymentTemplate.xaml.

image

6.  Fill in the required build process parameters.

  • Team Projects: this is a string list of team project names contained within the collection being updated.
  • TFS Server Collection URL: enter in the TFS url for the team collection being updated.  This will be like: https://tfs.pcbancorp.com:{port}/tfs/{Team Project Collection Name}. 
  • Work Item Type Definition Files:  a list of the work item type definition files which will be updated.  NOTE:  This list must be in the same order as the type name list defined in the step next bullet.
  • Work Item Type Name:  a string list of work item type names.  This must be in the same order as the file list defined in step previous bullet

image

7.  Save the build definition.

8.  Ensure that the [{TeamCollectionName}]\Project Collection Build Service Accounts role has the following permissions:

  • For the team collection the following highlighted permissions.

image

  • For each team project that is to be updated.

image

9.  You can now queue this build and watch your team projects within the given project collection updated with you process template changes!  Man, that beets manual work.

Debugging in Visual Studio and Eclipse, Hotkey Consistency

Most developers become accustom to hotkeys and shortcut key strokes.  I, for one, cannot live without them, but there is one thing that drives me crazy and that’s debugging with different key bindings between Visual Studio and Eclipse.  I’ll have to admit, that I should probably keeps with the Eclipse key bindings when it comes to debugging, but I’ve grown custom to Visual Studios F5, F10, F11.  To make my life a pleasant one, I like to modify Eclipse’s key binding when it comes to debugging.  Follow the step below to achieve just this.

1.  Open Eclipse and go to Window^Preferences.  Select the section General->Keys.  I like to sort the items by Binding so that the ones to modify are all clumped together.

image

2.  Modify the following items show in the diagram below.  Unbind the Refresh for “When=In Windows”, otherwise two operations will be bound to F5.

image


If you want to go the other way around and modify Visual Studio, then open Visual Studio and navigate to Tools^Options.  Select section Environment->Keyboard.

image

Setup Eclipse for Android Programming

This is a fairly simple process but there are always a few things I forget.  Once you have your Eclipse setup with Android development, you can Import some of there example projects and run them right way (point to you Android SDK folder and Import project process will find the available projects).

1.  Install a fresh copy of Eclipse just for Android programming.  I like to keep my Android development separate from other development using Eclipse, like Java, etc.  Follow my blog here on configuring Eclipse, I use the path c:\Tools\android-eclipse-XXX.

2.  Install the Android SDK.  I like to install in in my c:\SDKS folder.

3.  With Eclipse open, go to menu Windows^Preferences.  The preferences dialog will open.  Click the Android node.  You should see an input for SDK Location.  Pick the folder where the SDK was installed.  For me it was c:\SDKS\android-sdk.  Click the Apply button, then OK for the Preferences dialog.

image

Android Layout Stops Working in Eclipse

So far most of the Android development in Eclipse has been smooth sailing.  There is one issue I’ve come across over and over, I get the error message "No XML content. Please add a root view or layout to your document."  A few times I was able to fiddle with the layout and it would just start working.  This last ADK update, I had enough so I went searching again.  This time I found an answer to my prayers.  It turns out that if you have any custom device configuration in the layout editor that do not contain the proper qualifiers, you will get this issue, see thread here.

Solution

Add all applicable qualifiers.

1.  Open screen editor list.

image

2.  Open your custom screen, then move the necessary qualifiers over.

image

Connecting to TFS Preview : Visual Studio and Eclipse

Overview

Lately I’ve been working personal project here at home that requires both Visual Studio and Eclipse.  I was pleased when TFS 2010 came out and Teamprise (now Team Explorer Everywhere) had a seamless integration with TFS 2010, the experience is identical to that in Visual Studio.  One thing I grow old of is managing data from the personal projects or even small company projects that don’t need the hassle of installing, maintaining,and backing up an installation of TFS, especially at home.  When Microsoft introduced there TFS 2010 SaaS in the cloud, I was very anxious to try it out.  I was fortunate enough to get a taste thanks to Brian Harry.

Solution

In order to connect to your X.tfspreview.com account with Visual Studio or Eclipse you will have to do the following.

Visual Studio

1.  Ensure you have Visual Studio SP1 installed.

2.  Ensure you have hotfix KB2581206 installed.

3.  Now when you add a server like you normally would in the Team Explorer window you will get the following when going to connect.

image


Eclipse

1.  Ensure you have Team Explorer Everywhere 11 Developer Preview installed.  There is one caveat unfortunately.  There is a bug with this where it will not work for Windows XP running on 32-bit system (Arg!  I was a bit bummed at this as this is the dinosaur that I have; here is the issue I get).

2.  Now when you add a server like you normally would in the Team Explorer window.


Build Server

If you want to have a build server that talks to tfspreview you will need to install the latest for the preview as well, Web Installer or ISO.

Web Deploy 2.0 Setup Using TFS 2010 Builds

I have a previous blog post about setting up WebDeploy 1.0, which works well but 2.0 has more management features.  Despite the added management features, setting up version 2.0 seemed to be a bit more daunting.  One thing i noticed is that there isn’t much documentation out there but there are a lot of people blogging and posting on it.  In this thread I will summarize what I found was needed to get it working correctly for TFS 2010 or Visual Studio 2010.

Configuring Your IIS 7 Server

We’re using 2008 Server so the screen shots below will be from IIS 7. 

1.  Make sure the IIS Management Service is installed.  Go to Server Manager and add the Role Service as show below.

image

2.  Install the WebDeploy 2.0.You can download the platform version from here x86 or x64, 2008 uses x64.  NOTE:  Something that I ran into which seems to be a bug in the installer is that it missing installing a needed component.  To fix this you first install it then run the installer again but the second time you select Change which will then show you the extra item that wasn’t present the first time.  The installer should look like the image below, the highlighted section is what showed up the second time I ran the installer.  You must have all these components.

image 

3.  Go into IIS manager (Start^Run then type inetmgr).  Here you will need to configure a few items.  Select you server from the the connection dialog on the left.  You will be working in the Management section of the screen.

image 

4.  In the Management section, double click Management Service Delegation.  Once the delegation screen has come up you will want to add some new Rules.  In the upper right click Add Rule.  The rule that I needed was “Deploy Applications with Content” but you can add other predefined rules if needed.  I’ve found that the delegation providers I needed were “contentPath, iisApp, setAcl, createApp”.

image

The only thing I set on the rule was which type of user was going to connect to do the deployment.  In my case it was a specific AD account but it can be and IIS account.

image

5.   Go back to the Management home screen show in step 3.  This time double click Management Service.  In order to make changes you must stop the service first, which can be done on the right navigator.  The items that you want to take not for configuration are highlighted below.  Ensure that he check box “Enable remote connections” is checked.  The default port the service listens on is 8172, which I left.  By default the the install of the Management Service creates a self signed certificate.  I chose to create my own and use that.  Make sure the service is started before leaving this dialog (you can also find service is services applet with name “Web Management Service”).

image

NOTE:  If you enterprise uses a firewall, the call to the management service may not work.  You can check by going into a browser and navigating to https://youserver:8172/msdeploy.adx, if you are prompted for credentials it’s working otherwise the firewall is blocking it.

6.  This completes the IIS setup.


TFS Build Setup

Now that IIS is configured for remote deploy, we can create a build definition to deploy our web application to.  This is much like the previous blog post on setting up the parameters.  I’m going to skip all some of the attributes of the build definition as they don’t apply to making the WebDeploy work.

1.  Within your project in Team Explorer, right click Builds and select New Build definition.  Setup the basic build information:

  • General: build definition
  • Triggers: whatever triggers you want for this build
  • Workspace: select the workspace for the build
  • Build Defaults: select a build controller and drop location
  • Retention Policy: set any retentions you want

2.  The part that gets the web deploy working is in the Process section.  Expand all the numbered sections so you can see the attributes that need to be set.  First set the “Items to Build” which will specify the build flavor (i.e. Debug, Release, etc.) and the Solution/Project that represents you web application that you are deploying.

image

3.  The most critical piece is the MSBuild Arguments shown in the image above.  Unfortunately the arguments for Web Deploy are not well documented, but the ones below worked for my configuration.  You may have to grant you user permissions on the IIS machine to folders which pertain to you deployment, see this other good thread on configuration web deploy, Configuring MSDeploy in IIS 7.

/p:DeployOnBuild=True

/p:DeployTarget=MsDeployPublish

/p:CreatePackageOnPublish=True

/p:DeployIisAppPath="My Web Site Name"

/p:MsDeployServiceUrl=MyServerName:8172/msdeploy.axd

/p:username=MyUserName

/p:password=MyPassword

/p:AllowUntrustedCertificate=True

4.  Save the build and queue it.

Using SSL and TFS 2010 for Reporting Services All-In-One Install

A current deployment I’m working on for TFS requires that everything use SSL, which includes the TFS part and SQL Reporting Services (SSRS) reports (report manager/report web services).  We are diving into customization on some of the reports and someone mentioned that our Reports folder in Visual Studio has a red X on it (see below).

image

Everything else with regard to TFS was working fine over SSL, we could even access the report manager for SSRS, so I knew it had to be some in TFS that drove Visual Studio and the link in the Team Web Access.  Follow the steps below to fix this predicament.

1.  Log on to your TFS server and open the TFS administration console.
2.  Select the Reporting node in the left navigator

image

3.  Click the Edit link on the right side of the screen.  It will ask if you want to stop the schedule jobs, click OK.  A dialog with 3 tabs will come up.  Select the Reports tab.  In this tab, set the Web Service and the Report Manager to the SSL base URLs that represent your SSRS installation, for example https://tfs.mytfsmachine.com.  Note that once you change the Web Service url you will have to re-enter the data source user’s password.  Once you have update the fields, click OK.  See the image below.

image

4.  Start the jobs again by clicking “Start Jobs” on the right.  You are done.

To check that it all works go into Visual Studio and connect to your TFS server.  The red X should be gone from a team project’s Reports folder.  Also check you Team Web Access (https://{your dns name}/tfs/web/) to make sure that the link to the reports from the web page correctly uses the SSL url.

Deploy ASP.NET MVC Dependencies to Hosting Provider

Lately I’ve been working with Visual Studio 2010 and have been quite impressed by some of it’s features.   One feature in particular is the web site publishing capabilities.  The other day I was trying to frantically get a school project done and needed to deploy to my hosting provider, WinHost.  I have to briefly say that I’ve worked with a few top name providers that host ASP.NET and this one has been the best with great how-to’s on up-to-date technologies like Visual Studio Web Deploy and has a awesome management console.  Anyway, that’s not what I came to write about.  So after I deploy my code with a snap using Web Deploy, I get a few errors when trying to run my site.  Here I was all stoked that the Web Deploy was so effortless, to come to message like “Could not load file or assembly System.Web.WebPages.Razor” and “Could not load file or assembly System.Web.Helpers”.  Man what a buzz kill.  So not all hosting providers have ASP.NET MVC 3 yet (i.e. loaded in the GAC on there servers) which obviously we can’t do.  There are a couple of ways to fix this.  One is to grab the dlls listed below and store them in some library folder from which you can reference in your project.  The alternative, and better approach, is to indicate that your references you already have should be set to “Copy local”.  I’ve provided a screen shot and a list off the dlls which are needed by a ASP.NET MVC 3 application.  If you’re doing a MVC 2 or you will not need all these dlls.

image

DLLs needed:

  • Microsoft.Web.Infrastructure
  • System.Web.Abstractions
  • System.Web.Helpers
  • System.Web.Mvc
  • System.Web.Razor
  • System.Web.Routing
  • System.Web.WebPages
  • System.Web.WebPages.Razor

You may be wondering why your project doesn’t have all these references.  No sweat.  You can just add them.  I like to install Visual Studio Productivity Power Tools, it makes the add reference experience nicer.  Once you have the DLLs referenced in you project, right click the ones listed above and select Properties.  Set the “Copy local” attribute to true, see image below.  That’s it, redeploy your site and you’re set!

image